Enter your password to view comments.
2020 Projects In Review: Part 1 Monday, Jan 25 2021
Uncategorized 8:15 pm

It’s hard to believe we’re almost 1/12 of the way through 2021 already! I’ve been wanting to do this post (which is apparently shaping up to be a series of posts LOL) since late last year, but this is the first chance I’ve had—the first time I’ve been in between actually making things!

I turned out to be one of those Makers who suffered an unnatural spate of productivity during the (ongoing) COVID-19 pandemic of 2020. I did some baking, yes, but only under duress (thanks to the vagaries of Online Grocery Roulette). Husband CJ had more fun in the kitchen, whipping up several experimental dishes. Most of my Making, however, was in the sewing room, where I found a new outlet for my historical costuming. And when I wasn’t actually sewing, my fingers and needles were busy with embroidery, needlepoint, and quilting. Yes, quilting!! Today I’m going to share my 2020 projects in a category that has not had a lot of love here on the blog in quite a while.
NEEDLEWORK
My big accomplishment last year was finishing my Beth Russell needlepoint kit, the William Morris Fox tapestry! I started stitching this around New Year’s 2019, and finished it summer 2020. I do a needlepoint project about once every twenty years (!), so I don’t have all the right supplies, like proper stretcher bars. I made do with a nice set of scroll frames, and it worked out fine (although it will need to be blocked). I loved working on this project so much, and it turned out just beautifully. Eventually it will be framed in an obnoxious gold Baroque frame and hung in my office.

After finishing the fox, I missed working on it so much that I immediately started another little needlepoint project for which I had none of the proper materials, a Victorian chair cushion for a doll chair! I was determined to work this entirely from stash, but I didn’t have any tapestry canvas or black or blue needlework fabric in the right scale, so I just filled in the background of some ivory aida cloth. It turned out exactly like I hoped—but all that navy tent stitch did take an age!

While I was working on the chair cushion, my beloved father-in-law passed away from a stroke. Social distancing kept me at home, but I stitched a mourning hankie for my mother-in-law:

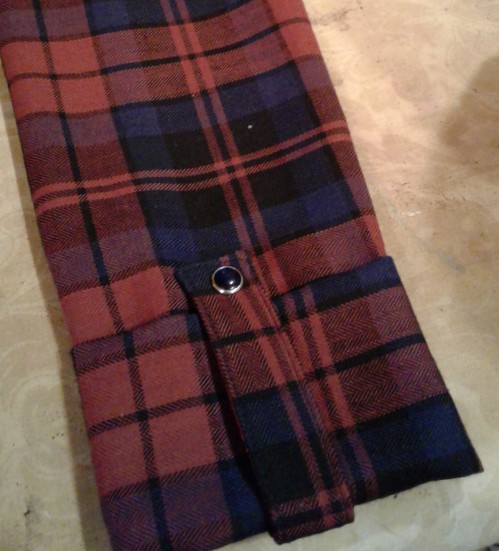
Milton ended up inspiring another needlework project last fall. He was a navy veteran and an avid model shipbuilder, and CJ brought home his beautiful model Cutty Sark. It had been stored in a dusty garage for a few years, so it arrived bedraped in cobwebs, looking like a ghost ship. Which reminded me that I had a cross stitch project kitted up but never started… This is Cross Eyed Cricket’s “Skeleton Crew,” as of about Hallowe’en. The ship is pretty big so it might take a few years–but it does seem to stitch up quickly:

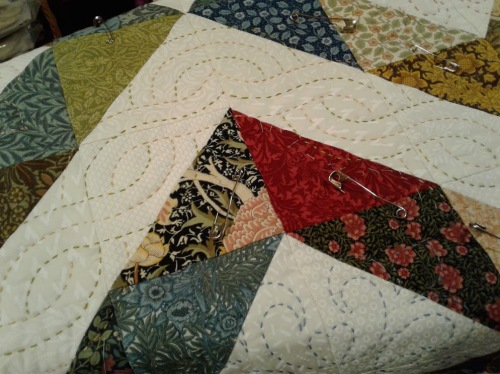
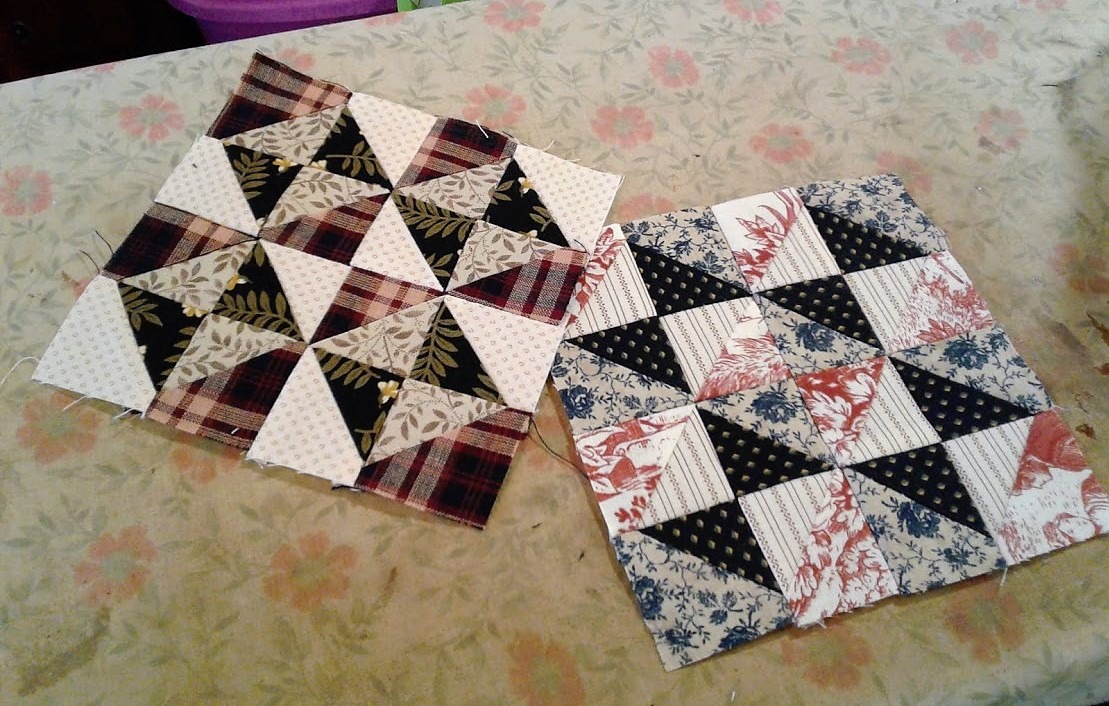
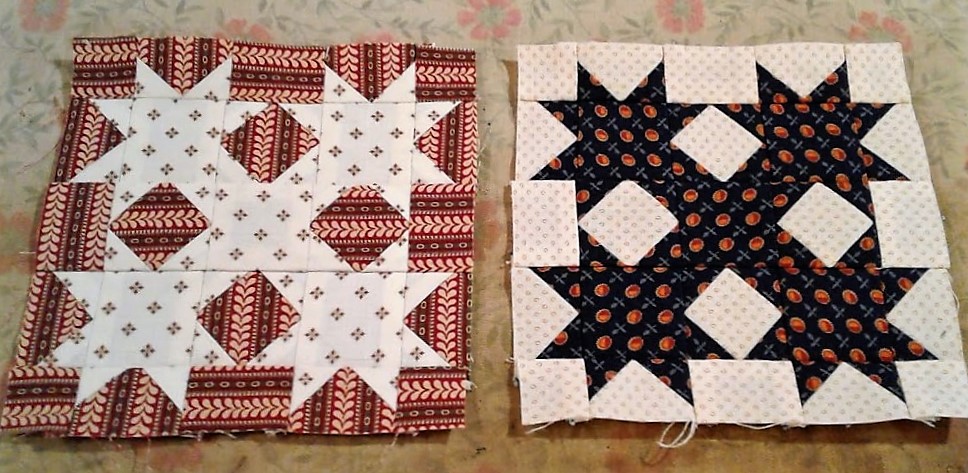
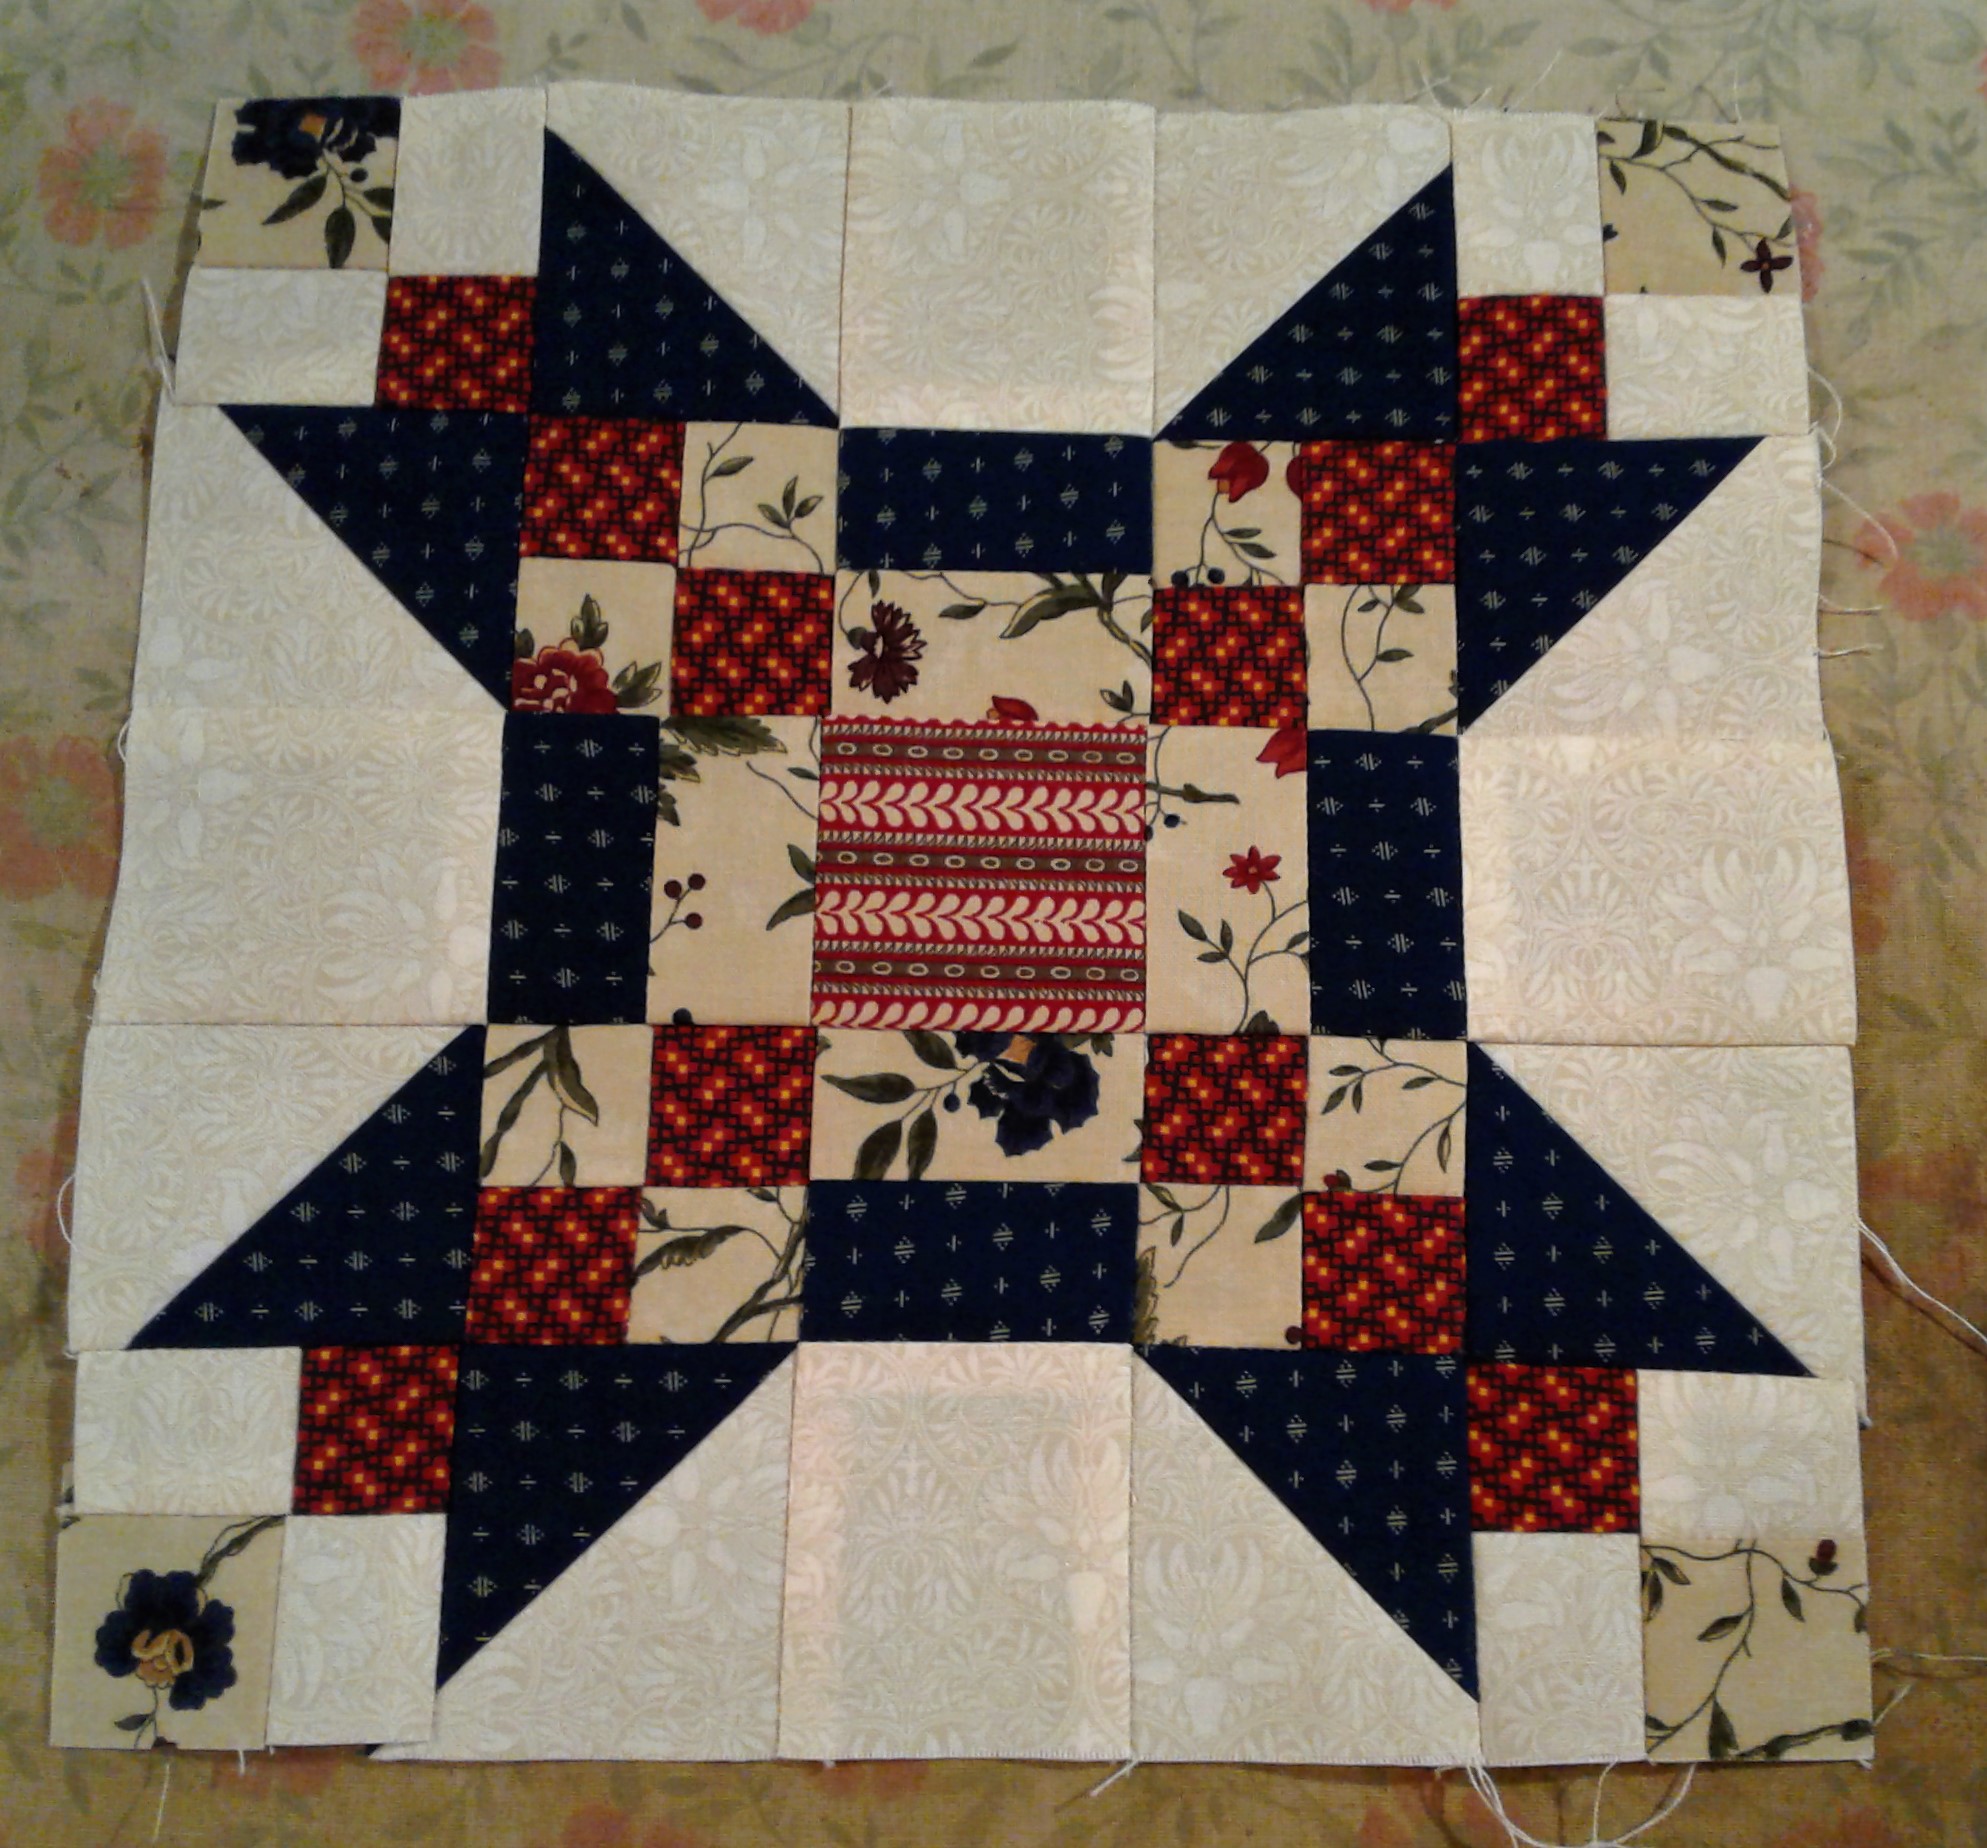
But my Epic Embroidery Project of the year ended up being a dark horse surprise. I spontaneously started making a crazy quilt! I really struggled with the embroidery when I began. I found getting the stitches even on the various fabrics to be quite frustrating, wrestled with what hoop/frame to use, and tried and discarded every marking tool and stencil under the sun. I setting this project aside for weeks at a time, pulling it out only long enough to swear my way through a single row of stitches. But I persevered, and when I picked it back up again in December, I really hit my stride! My first two blocks took about six months; my next two took three weeks! The improvisational nature of the stitching was intimidating at first, but I’ve really fallen in love with the freeform doodling, not to mention the history of it all. I’m hoping to finish this by our 25th wedding anniversary in September. I’m planning on 12 blocks, and I’ve stitched four:

For the holidays, COVID shipping/shopping restrictions meant I couldn’t send my colleagues gifts for the whole office (since everyone is working for home), so I embroidered cards for them instead. What a fun project this was!! I’m not promising to stitch cards every Christmas—but I’m not promising I won’t, either.

This was the most embroidery and needlework I’ve done in years. I think I was inspired by the fun I had hand-quilting earlier in the year. Although counted cross stitch will always be my first embroidery love, I really enjoyed not being tethered to a chart, and being able to just pick up the work and *stitch.* I don’t see myself putting down my needle again any time soon!
I’m only scratching the surface of 2020’s output here. I also sewed an entire work wardrobe, tumbled headlong into doll costuming, and made two quilts! Stay tuned for more on all of that…
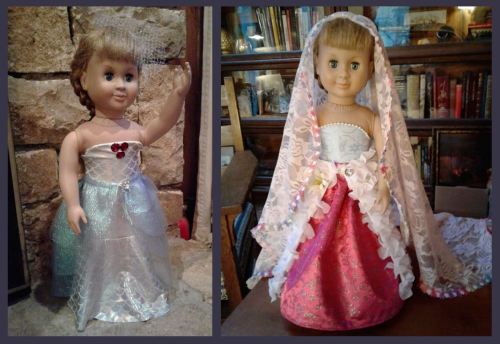
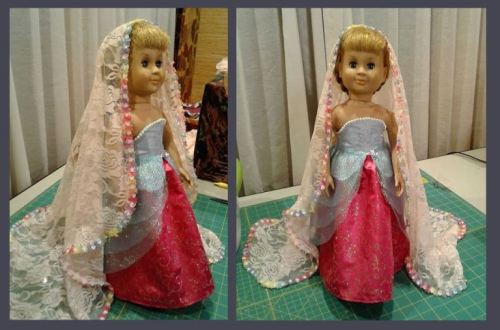
A book-inspired doll ensemble! Monday, May 25 2020
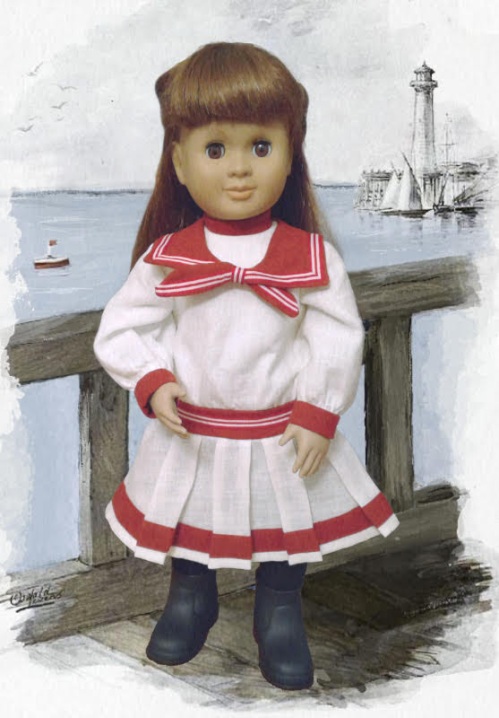
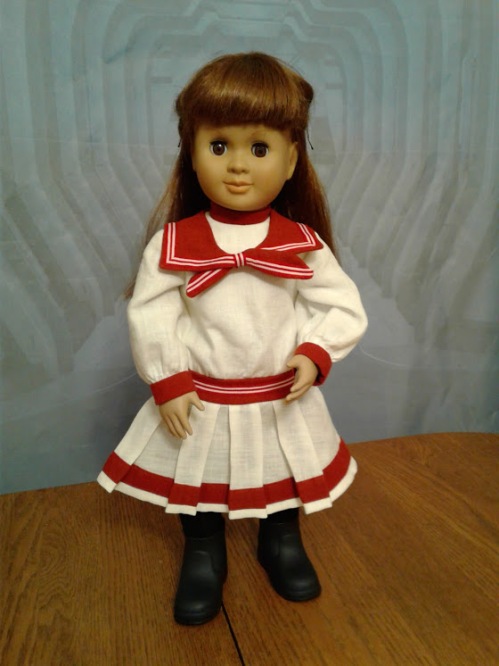
This magnificent image is the work of the brilliant Jenn from Centuries Sewing. She caught my middy enthusiasm (and perhaps had some sympathy for her landlocked midwestern friend!) and created a beautiful Victorian background for my latest creation.
Having hit on a perfect topic for my Memorial Day #MyrtleMondays blog post at elizabethcbunce.com, I decided to complicate—er, enhance the experience by making a perfect doll-sized version of the spectacular cover art for How to Get Away with Myrtle.

The middy worn by Myrtle on the cover was inspired by a real 1890s sailor suit:
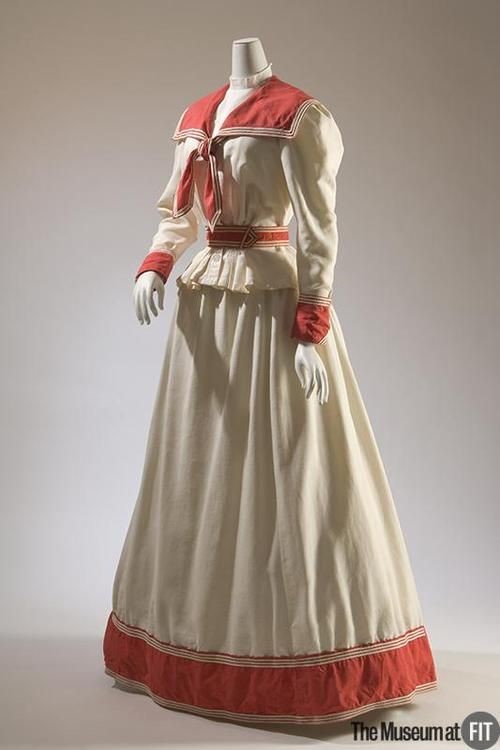
… And so, in turn: the real 1890s piece became a book cover, then became a doll costume, 130 years later!
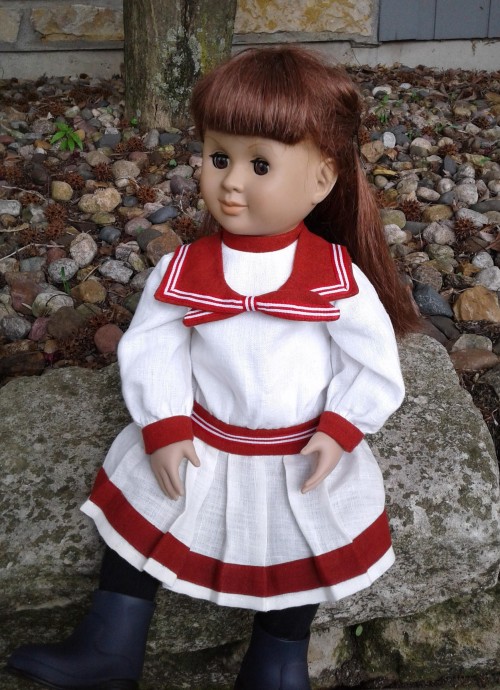
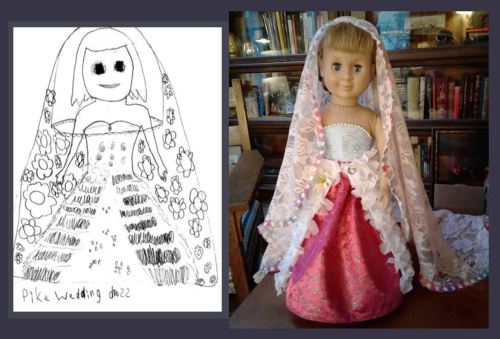
My doll sewing adventure began last winter, when my nieces requested custom wedding gowns for their new American Girl dolls. I quickly realized how much fun sewing these little outfits was—and better yet, what a perfect outlet it would be for my costuming impulses on Myrtle’s behalf! I don’t have a handy twelve-year-old to model any Victorian costumes, and making them for myself 1.) takes forever, and 2.) wouldn’t be the sorts of things that Myrtle would wear. (Well, most of the time, anyway.)
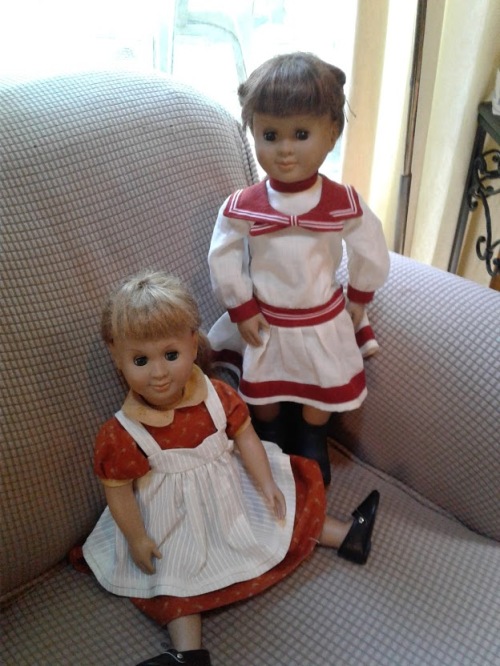
I have two vintage 1990s Battat Our Generation dolls—one I found as a fit model at a local thrift store, and another I found on ebay after searching high and low for a model that looked like Myrtle! This doll with her reddish brown hair and straight-cut fringe was just perfect. This is the first complete outfit I’ve made for her (fortunately, she came with clothes, so she hasn’t been sitting here like an urchin all this time!).

The pattern I used is Simplicity 1179, which is marketed as early 1900s costumes:
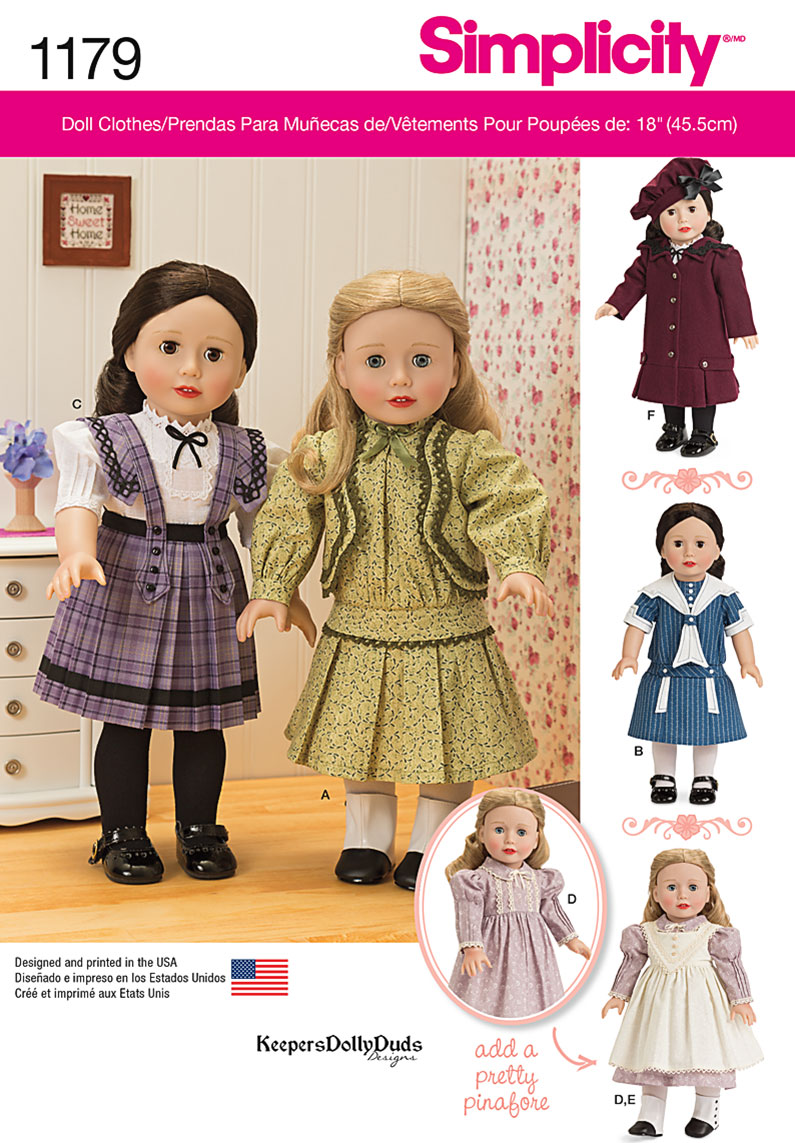
Children’s fashion changed somewhat more slowly than adult clothing, though, so these styles are still very much appropriate for the 1890s.
I redrafted the collar pattern, to create the square shape-with-flippy-ties that is the centerpiece of Myrtle Hardcastle’s Book 2 ensemble!
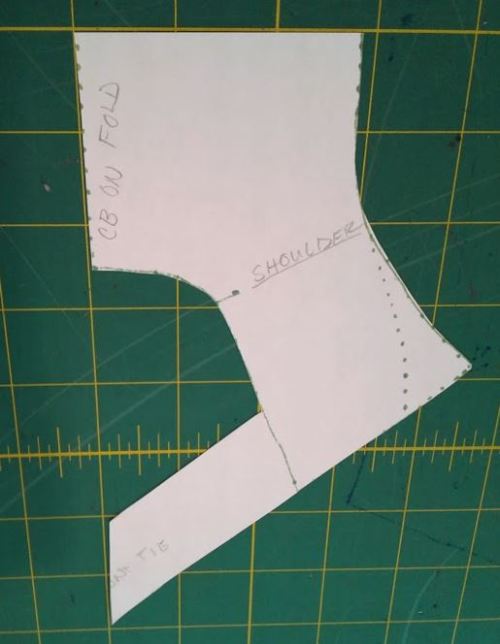

Everything came from my deep stash, from my heaps and heaps of linen to the serendipitous red-and-white striped ribbon that trims the collar. It came together beautifully—a lucky thing, considering the rather last-minute nature of this idea!
You can read my more thorough review of the construction process at PatternReview, or just enjoy all the photos below!
(Yes, she is standing in front of a space station corridor. It was the plainest backdrop I could find for Jenn’s Photoshop work!)
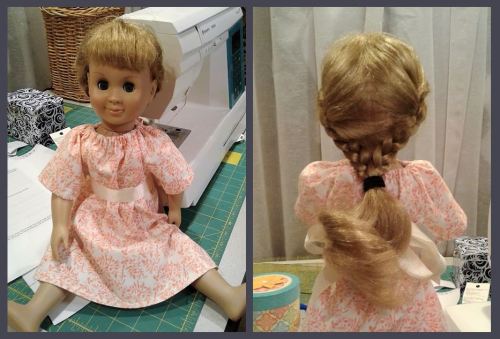
I love the black tights and Wellies that are such a hallmark of this era: floofy white dresses and black stockings and boots! (I was a little worried that they’d show through her white linen skirt since I didn’t have time to make her a petticoat–SCANDAL!!)
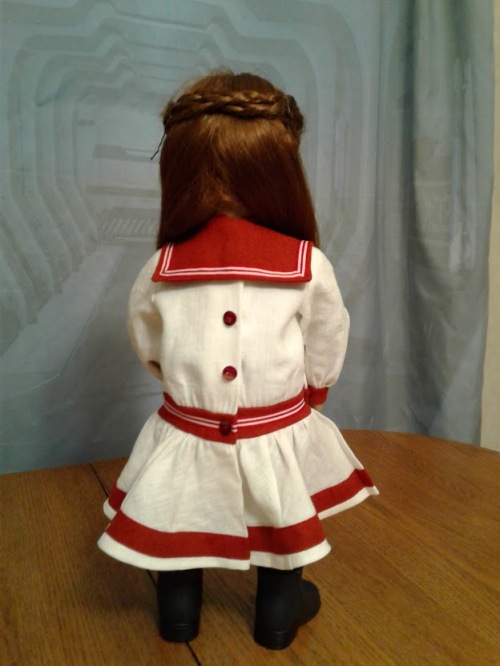
There are snaps hidden under those red buttons. Doesn’t she have such a pretty hairstyle? Myrtle’s hair would come undone in five minutes flat–which is precisely what this doll’s does, too. (There was much touching-up during this photoshoot!)
I have another Myrtle-inspired doll ensemble coming soon. Stay tuned!
Big Stitch Hand Quilting: a perfect marriage of sewing and needlework! Friday, May 15 2020
Needlework and Quilt and Uncategorized 4:12 pm
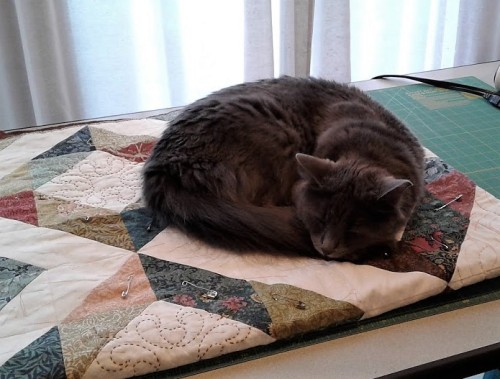
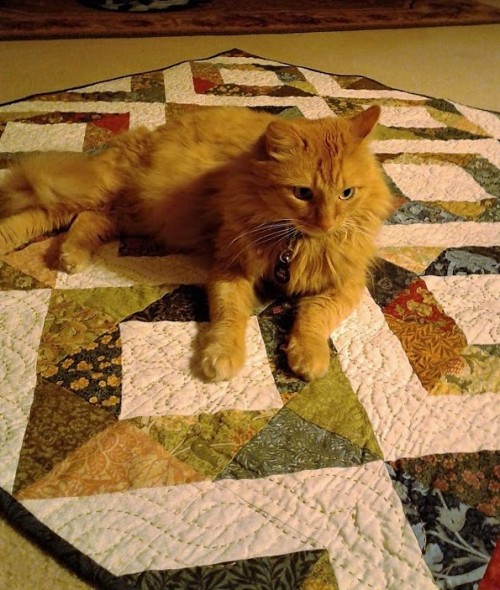
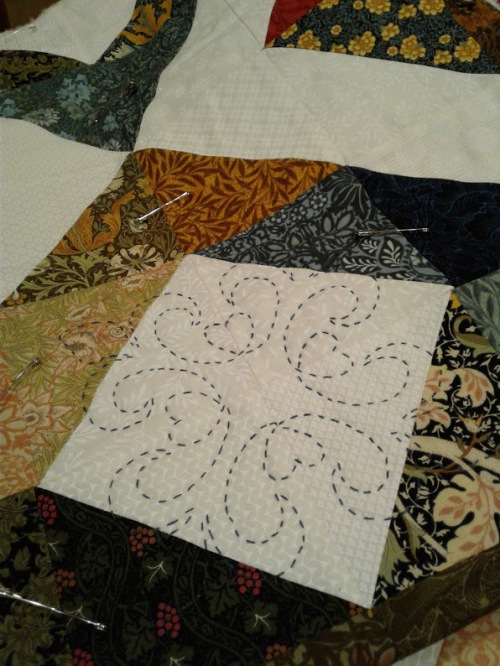
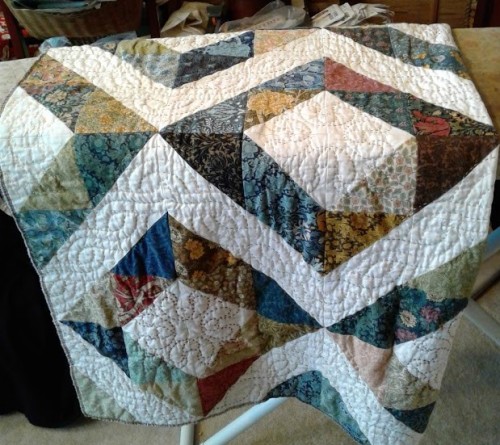
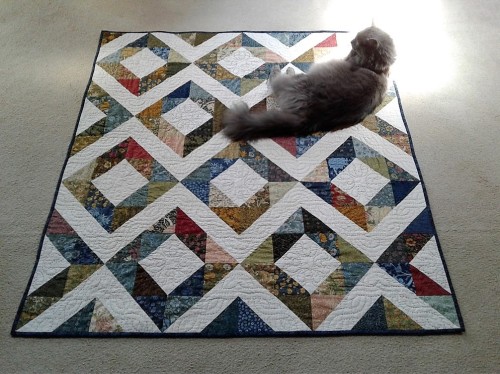
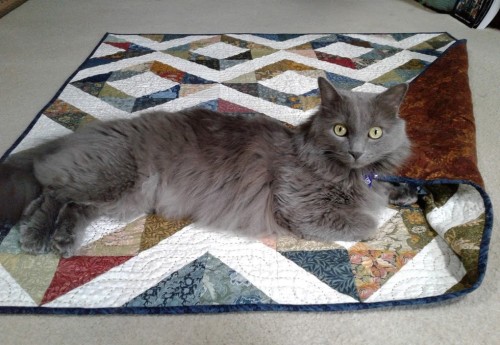
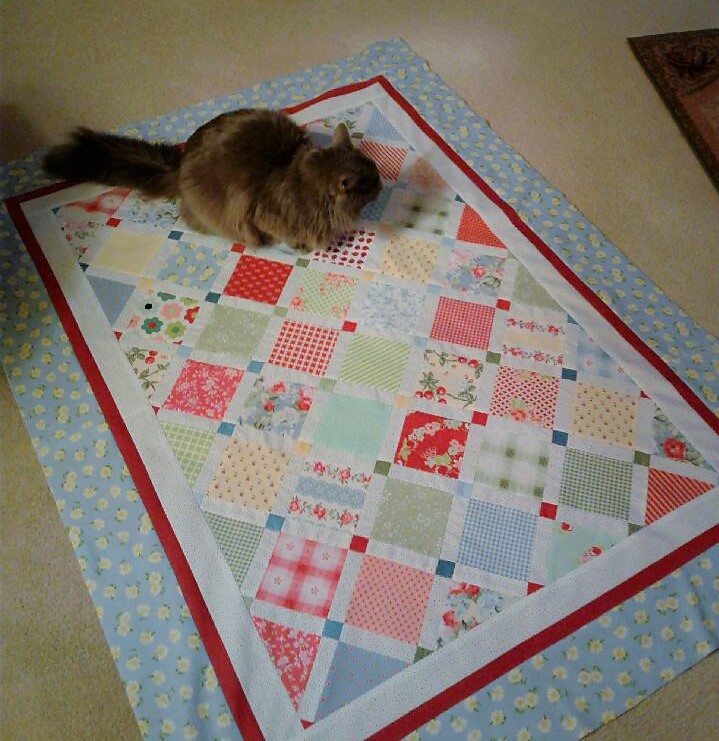
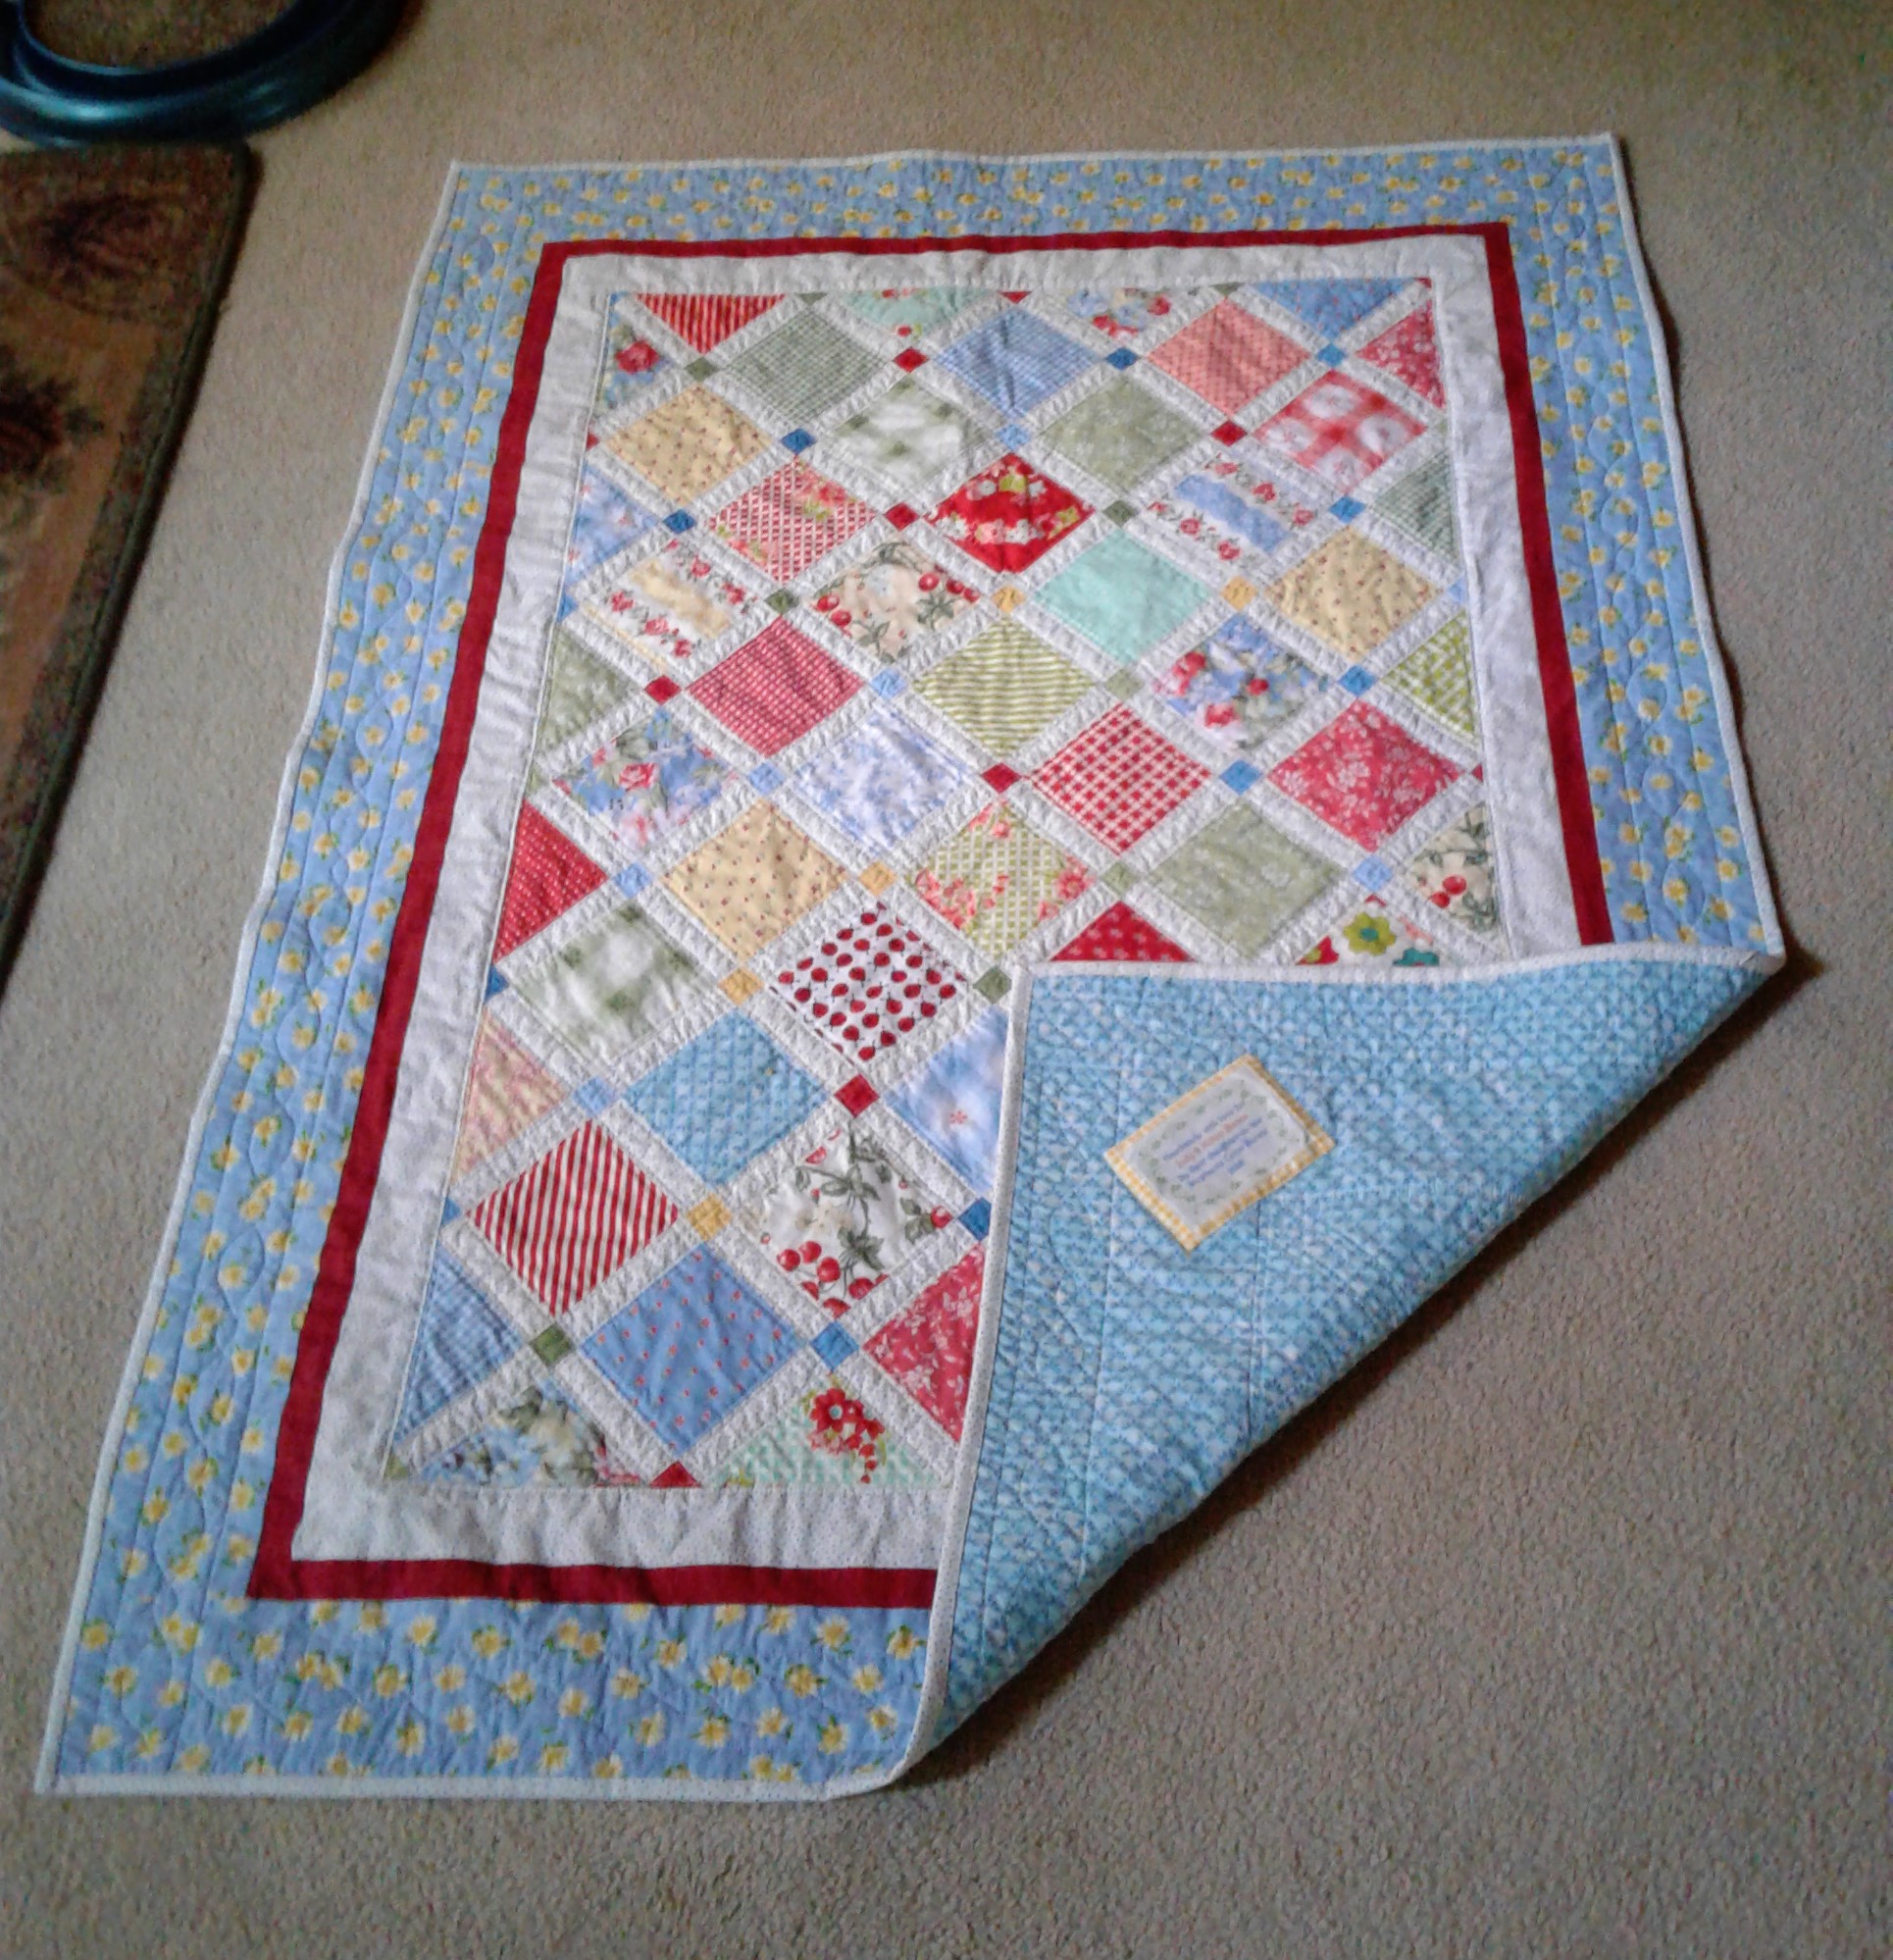
This project has been getting a lot of love the last few months. It’s “Fresh Diamonds” from Samelia’s Mum, a throw-size quilt made of half square triangles, which I pieced in January. The yummy fabrics were charm packs of William Morris prints from Moda, and Wilmington Essentials in the colorway Cookie Dough (lovely white-on-cream prints that pair beautifully with the Morris prints, giving some depth and interest to the sashing. I had several people tell me they’d never have thought of mixing all those white prints, but they loved the results. So give it a try: Mix up your neutrals!!)
I made this for a specific purpose: In February, I took a big stitch hand quilting class! Since falling in love with quiltmaking in 2016, my enthusiasm has only grown… except for the quilting process. Every time I machine quilted a quilt, I would think, If I do this enough, I’ll learn to enjoy it.
But, in fact, I liked it even less with each subsequent quilt. I have a nice machine, plenty of harp space, and a lovely extension table… but I just really, really don’t like wrestling a big mass of fabric across my sewing table.
I do, however, love handwork. While admiring some beautifully hand-quilted quilts on display at the quilt shop, I discovered that they offered a class in big stitch quilting: quilting with perle coton/pearl cotton!
This might have been something I could have figured out on my own, but for a couple of stumbling blocks I’ve had hand-quilting in the past: My lifetime of needlework was getting in my way. I’m a confirmed stab-stitcher, and I expect work in a hoop or frame to be drum-taut. I couldn’t get used to the notion of loosely hooping my work, and the running stitches of fine hand quilting felt doubly unnatural. Also, I’d really struggled with the most basic of hand-quilting skills: the quilter’s knot. (Insert appropriate emoji there!)
But expert big-stitcher Cynthia Schrader walked us through the basics, and helped us get out of our own way. She recommended taking one stitch at a time, and wholeheartedly approved of my decision to pitch my hoop! By the end of the first class, I was off and running.
I would have thought that I had a lifetime’s supply of perle cotton–but naturally I had all the wrong sizes and colors. Local shops seem to favor size 5, but after some testing, size 8 (the next size smaller) seemed better to me. I ordered a couple of sets of Thread Art pearl cotton from Amazon, and they’re wonderful! Splendid colors, lovely to work with, generous amounts on the spools, more readily available than DMC, and more reasonably priced than Presencia. ($8 a ball? No thanks!)
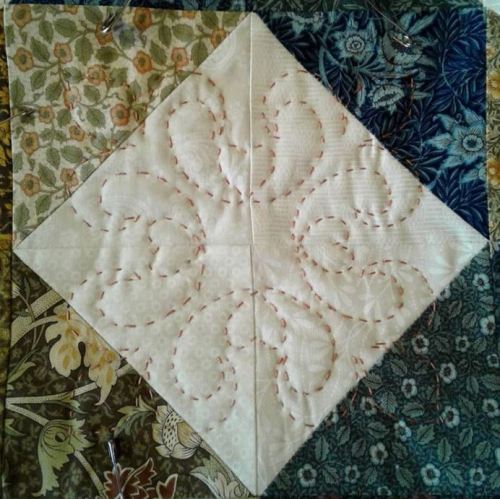
I took a scrappy approach with the quilting, because I was new and experimenting, and I wasn’t sure what colors I would like. Well, it should not have been surprising that I LIKE THEM ALL! But my favorite, for this quilt, was a sort of butternut color, which I used in the cables in the sashing. At the suggestion of my little guild (fellow members of my mini-quilts class), I added in a shade of yellow green.
My single reservation was that the batting I used (bamboo rayon) is not especially lofty, and as I was working, it looked like I was embroidering the quilt, not quilting it. But a trip through the laundry gave it some glorious texture, and now it looks exactly right!
I worked on this during our state’s stay-at-home order (and while finishing the third Myrtle Hardcastle book!), and it was an ideal project for such a stressful time. I got the thrill of mastering a new skill, and the comforting familiarity of practicing an old one.

I’m so happy to have found my quilting niche! I’m not writing off all machine quilting forever, but I think from now on, this will be my go-to finish. It’s all win.
My first bridal sewing commission… Friday, Feb 7 2020
Although I haven’t posted here much, I have been sewing like a madwoman for the past several months! I’ve been quilting, costuming, clothing-sewing… I do most of my fly-by posting now at Instagram, so follow me there, for quicker, more frequent updates.
This winter I was commissioned to make wedding gowns for my twin nieces’ new American Girl dolls. What a fun and involved project this was! The girls designed their gowns, and it was up to me to fulfill the brief. Tracking down the Very Specific requested fabrics and working out the construction of these special ensembles was quite the adventure, but in the end it was so much fun. CJ asked me what took me so long to get involved in sewing for dolls!
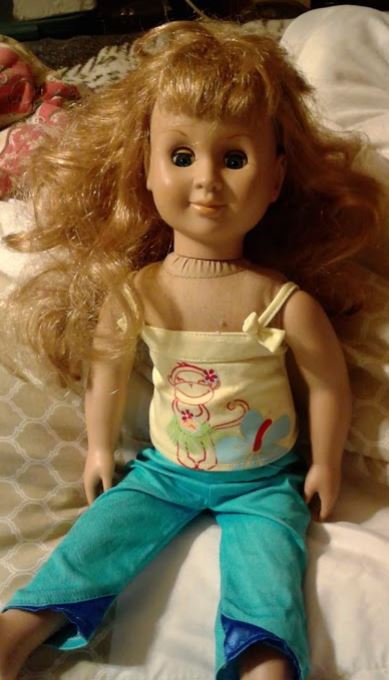
Georgie Before. As a friend noted, “That doll has Seen Some Things.” LOL
The first necessary step was recruiting a fit model for these projects. A true American Girl doll is well outside my budget, but fellow doll sewists online suggested checking out thrift stores. I was able to find a vintage 1990s Battat Our Generation doll for a very affordable $5.99. She just needed a bit of TLC, and she was ready for her new career.
After a trip to the salon and more respectable outfit
The second step was practicing some new-to-me techniques. I expected that translating clothing construction details to the small scale of dolls might present some challenges, so I stocked up on research materials and patterns. My library had a copy (with the CD of .pdf patterns) of a Joan Hinds book, and I picked up a couple additional patterns, as well.
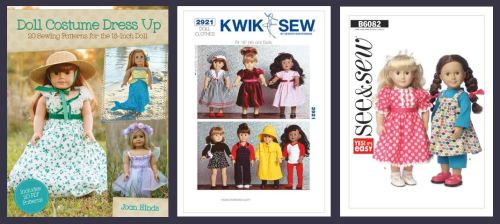
Joan Hinds, DOLL COSTUME DRESS UP, Kwik Sew 2921, and See & Sew 6082
I pulled some fabric from stash, and got to work.
I made a dress, pinafore, tights (from a tutorial), and little wool felt slippers (from the book). I was hooked! This was some of the most fun I’d had sewing in a long time. Thus energized, I got to work on the wedding gowns and assorted accoutrements.
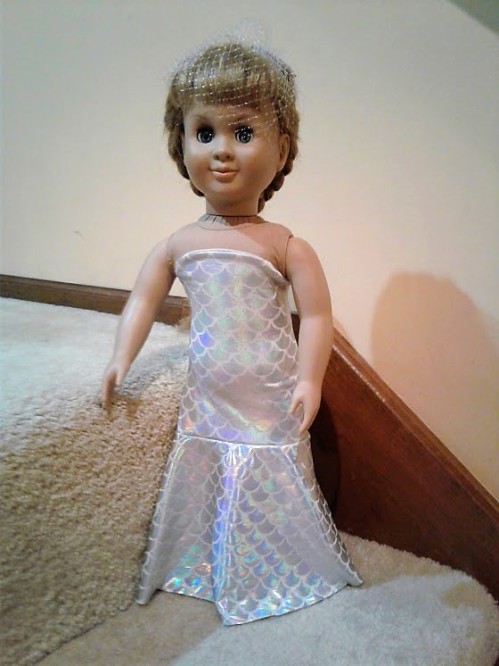
Tavie’s Mermaid Gown
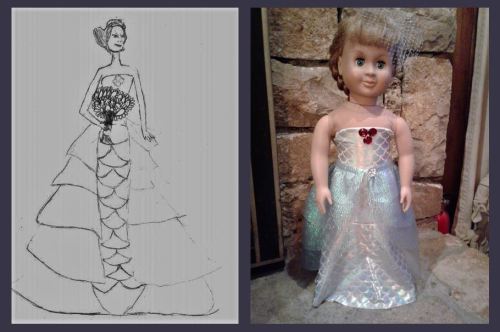
With a little artistic assistance from Dad, Tavie designed a strapless mermaid-style gown (“See the scales?” LOL) with a layered blue overskirt and red jewels on the bodice.
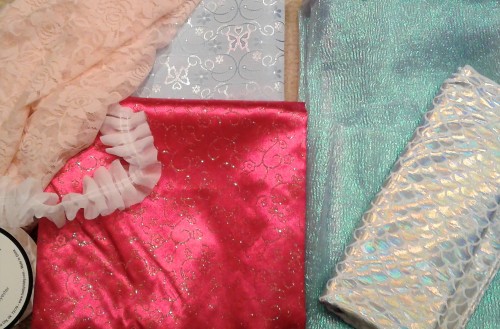
I found perfect fabrics–a mermaid-scale foil print jersey and some glorious blue iridescent organza for the overskirt.
A friend pointed me toward the Liberty Jane Sheath Dress pattern as a base for the ensemble.

I began by altering the pattern to make it strapless, and drafting a flouncy skirt for the mermaid part of the gown. More details are in this review.
The gown required some fiddly fitting to adapt a woven dress to a strapless knit dress—mostly removing some ease (and then some more ease, and then even more ease!), but in the end it turned out beautifully and stays up on its own, even with the added weight of the red jewels. (I found a very useful packet of inexpensive jeweled buttons in lots of colors [actually, they’re more like buttoned jewels—jewels with holes drilled in] and used several of them throughout both ensembles! A great addition to the stash.)
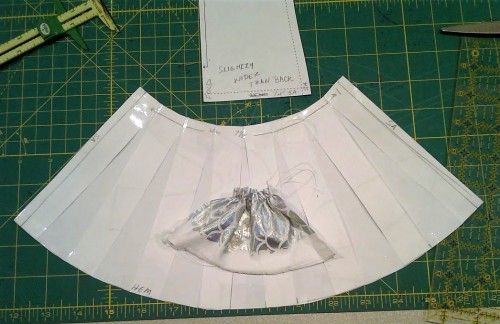
The overskirt flummoxed me a bit—I had trouble imagining what the pattern shapes for the skirt should be. Finally I gave up trying and just made something up! With skirt-length guidance from the Joan Hinds book, I cut 4 rectangular panels from the organza twice the doll’s waist measurement. Each panel is 2″ shorter than the next, so they’ll fall in graduated tiers: 3″, 5″, 7″, and 9″. I then stacked them up and gathered them all together with my serger, which worked beautifully. I felt the gathers could still use a little more oomph, however, so I ran them through a second time, gathering them again by sewing machine. Perfect! Then to make the floaty petal shapes, I folded the skirt in half, and cut the fronts into a nice smooth curve:
After that, I added a waistband and a jeweled button-and-elastic-loop closure. This fabric was sheer delight (ahem) to work with. It doesn’t fray at all, so there’s no need to hem these pieces, and it gives such glorious fanciful sparkle. It reminds me of tropical fish—their iridescent fluttery fins. I wasn’t really going for full-on mermaid with this gown, but thanks to the fabrics, I kind of got it!
Tavie didn’t include a headpiece in her design, but I felt it needed one, so I whipped up a simple little birdcage veil.
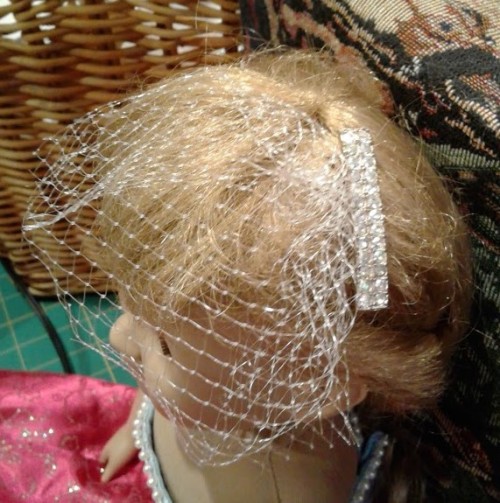
I followed this tutorial for a human-sized version, just adapted it for doll size. It’s a very forgiving project–nothing has to be terribly exact. I just happened to have on hand some perfect white doll-sized netting for the veil, from an unexpected source: it was the packaging for some dollar store Christmas candy! We hung onto it thinking it might be useful for something, and we were right! I cut it to shape, gathered it up and whipstitched it to a vintage rhinestone barrette I found in my hair-stuff drawer. Perfect!!
Irene’s Pink Wedding Dress
Irene designed an even more elaborate and specific ensemble: A strapless gown with a light blue bodice with swirls (“swirls can be any color”) and “ribbon or trim” at the neckline, a white ruffled skirt with a daisy on the hip, and a dark pink or red “triangle” in the middle, with silver accents. It has a pink lace mantilla veil with multicolor floral trim. I quickly reinterpreted this as a pink skirt with a ruffled overskirt. But how on earth to find such very specific fabrics?
In a panicked, last-minute New Year’s Eve run into a store five minutes before closing (never underestimate my ability to shop for fabric under ANY conditions!), I found some drapey pale pink lace and this lovely organza trim that looks like rosebuds for the mantilla (this is also when I found the mermaid fabric). On a more leisurely stroll through JoAnn, I lucked into the perfect fabrics for the gown: a pale blue butterfly-and-swirls brocade, and some fuchsia satin with a silver glitter floral print!
All the fabrics! Irene’s on the left, Tavie’s on the right.

This took HOURS to sew and years off my life, but it’s beautiful, so it was worth it!!
I wasn’t quite sure how they’d all end up working together, but hating to disappoint a seven-year-old by imposing my stodgy aesthetics (“can this dress have more brown?”) on her designs, I dove right in. And I must say, her sensibilities were spot on. It’s an over-the-top confection of pink and sparkle and ruffles (and pearls and lace!), but it definitely all works!
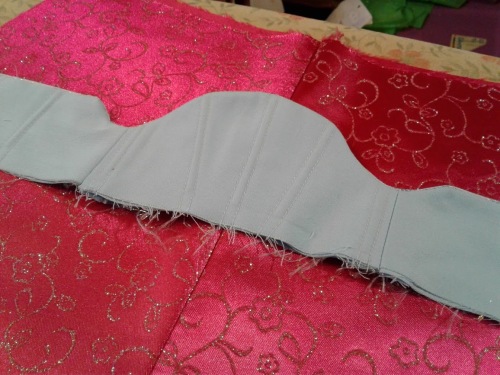
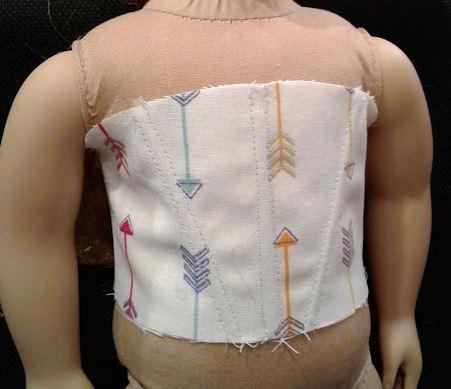
I realized that fitting the second strapless bodice would require a different approach this time, with the woven fabrics, where I wouldn’t be able to rely on the stretch of the fabric to hold it up. Instead, I opted for boning, in the form of itty-bitty zip ties! I don’t know why we had these practically microscopic little things in our zip tie stash in the tool chest, but obviously they were meant for doll dresses. I sewed the boning channels into the lining fabric, although they would have been really pretty visible in the outer bodice, too. The boning channels are really tiny—just 1/8″—so separate casings would have added way too much bulk, which is a concern when you’re working at a small scale.
And a shot of the mockup, because even that was so darned adorable!
The fabrics I chose looked fiddly, but in reality they sewed *beautifully.* I couldn’t be more pleased with how well they handled beneath the needle, through the serger, and under the iron. Huge props to JA here for producing these surprisingly nice and affordable special occasion fabrics. I’d use the pink glittery stuff in a little girl’s dress easily, and the brocade would be lovely for anyone.
I got a bit ahead of myself there, but I used the same Kwik Sew pattern I used for the little orange test dress, just altered to be strapless, and with a full-length skirt. (Not having to set in those tiny, tiny sleeves actually made the construction much faster and easier.) I made a couple of tweaks to make it a little more serger-friendly, but the materials handled so nicely (I could not believe how well that pink satin gathered!) that I could have done it on the machine just as easily. Still, serging makes for a sturdy, clean finish inside, which is nice.
For the trim on the bodice, I dug through my stash and found a strand of pearls, which I simply whipstitched to the top edge, around the neckline, while watching “Sabrina.” 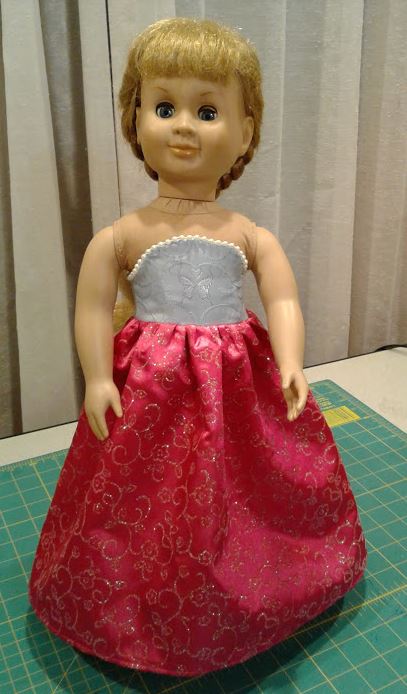
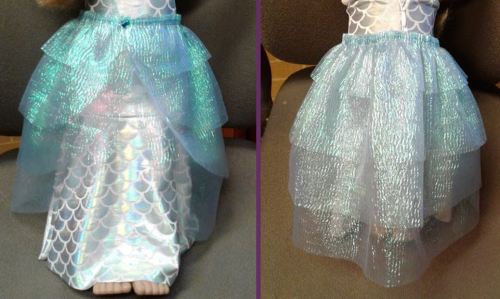
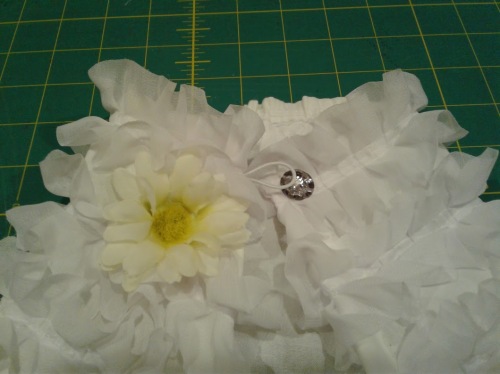
The overskirt was made much the same way as the tiered organza version. I cut a trapezoid of white muslin twice her waist measurement by the length I wanted (22 x 11″ plus hem allowances), then finished all four sides and gathered the top edge. Next came topstitching row upon row upon row of ruffled trim onto the right side. The top layer of trim holds the gathers in place, and the hem finishes the waistline edge. I wasn’t completely happy with the drape of the finished overskirt, so I folded the front edges in a bit more to expose more skirt. The last touch was another elastic loop and sparkly button.
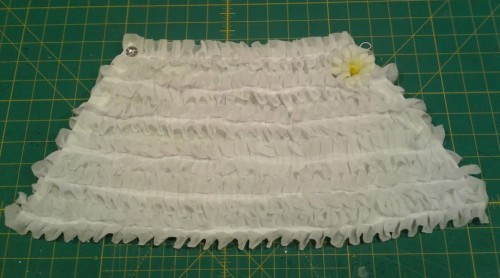
With the all-important daisy!
The final piece of the ensemble was the mantilla veil. I studied a lot of veil tutorials to suss out the pattern shape, and draped my half yard of pink lace on Georgie to determine the length and hemline:
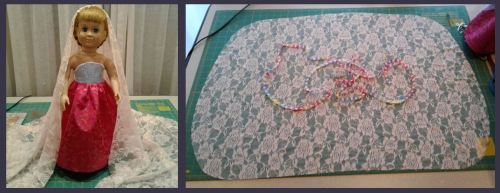
I roughly pinned around the shape I wanted, then took the lace, laid it flat, and cut it with the rotary cutter. My first cut was too long for my trim, so I popped it back on and trimmed it freehand until it was the right size. The final shape ended up a sort of oval. The bottom edge (which is almost straight across) goes across the head, and the top curve is the back. The shorter ends of the oval are the sides.
…Then I spent roughly the next twenty-seven years hand-sewing the trim onto the veil. Wedding bloggers are BIG FAT LIARS! I saw so many tutorials that claimed “it took about an hour.” I am giving them the evil eye right now, because this took at least three times that–and was TINY compared to a human mantilla! You have been warned.
She’s wearing the blue organza overskirt here–everything is mix-and-match!
Still, the whole ensemble could not be more fabulous! This was a grand adventure, and except for about two hours of mantilla sewing, I loved every single second of it! I want to sew All the Doll Things now, and in fact am looking for a friend for Georgie. Stay tuned…
(But first: more quilts and an Epic Historical Costuming Project. After this, however, I feel like I can tackle anything! Maniacal laugh, maniacal laugh….)
UPDATE! My sister-in-law sent me these wonderful pictures of Tavie and Irene with their wedding-ready AG dolls! Huzzah! 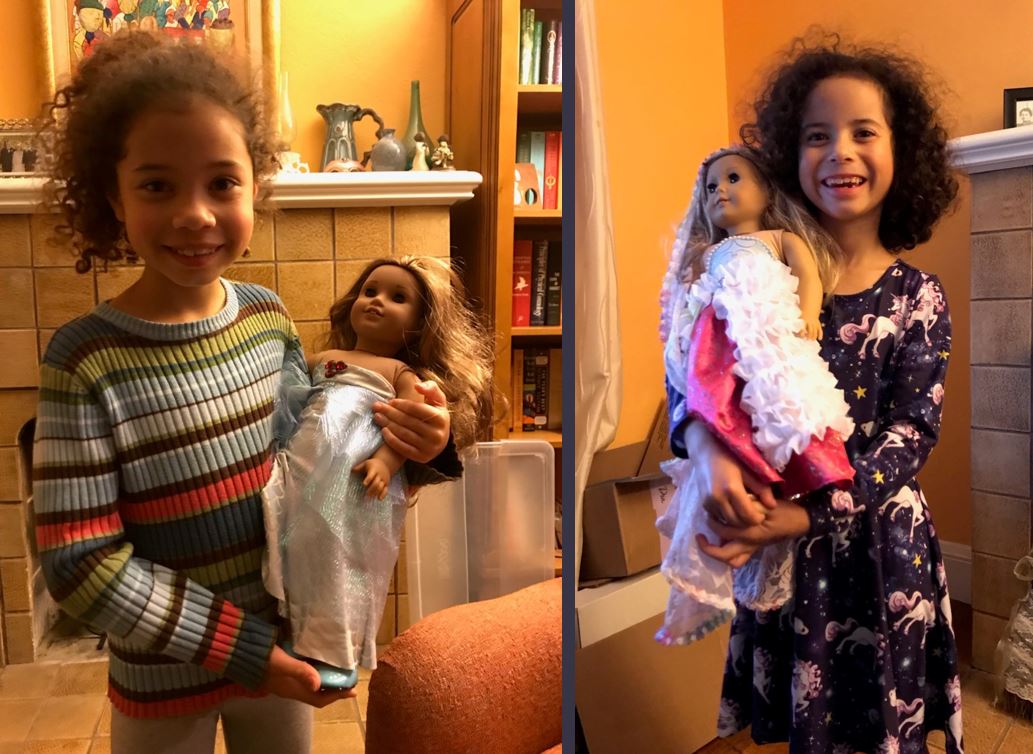
Spring Quilting: Hope’s Journey Monday, May 13 2019
Uncategorized Betsy Chutchian, BOTM, Broken Dishes quilt block, Forest Path Quilt Block, Game Cocks quilt block, Lady of the Lake quilt block, Lost Ships quilt block, Turkey Tracks quilt block 4:19 am
I’m taking a class at my local quilt shop, working through Betsy Chutchian’s book Hope’s Journey.

It’s been really fun experimenting with these new-to-me blocks, and working with an equally new-to-me limited color palette of cream/beige, red, and navy. After three months, here are the blocks I’ve done so far:
Month/Chapter 1:
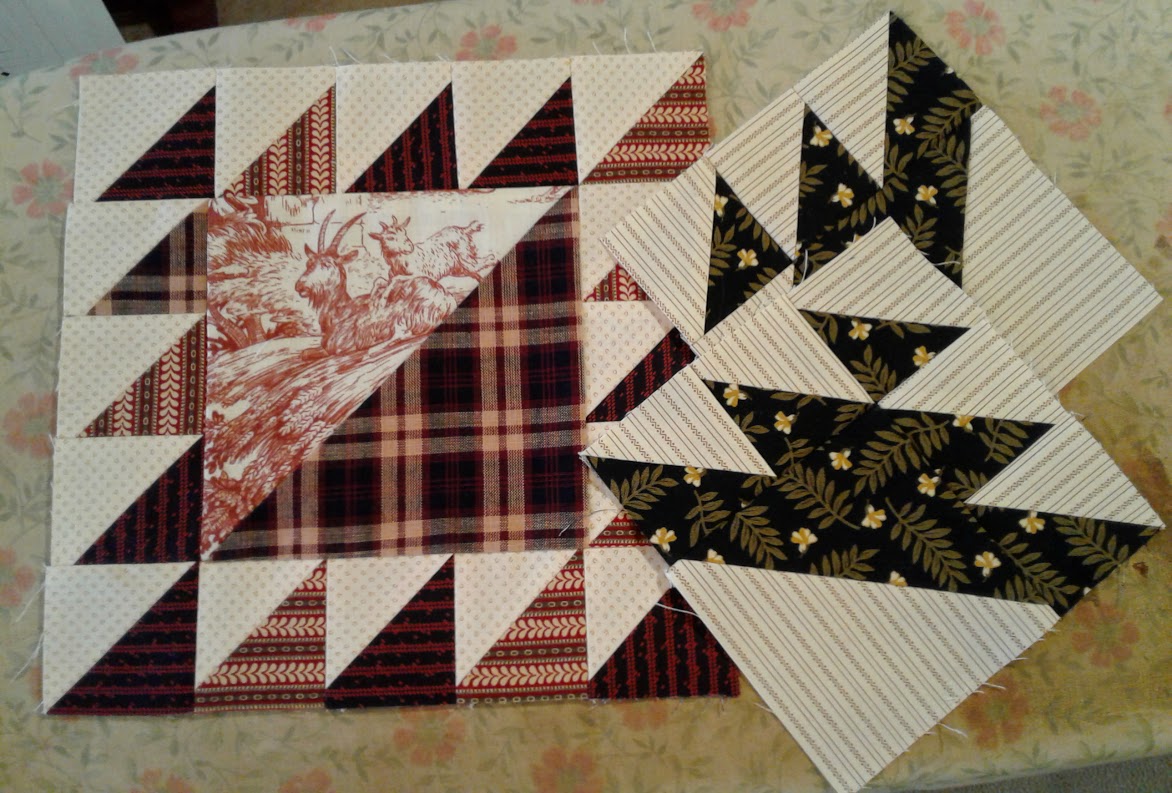
Along with the monthly blocks, there are miniature quilts in each chapter; the one for chapter 1 is all tiny versions of the Lost Ships block. I took the class for these mini-quilts, but haven’t had time to make any of them yet!
Month/Chapter 2:
I didn’t care for the blocks in this chapter as much, so I skipped one entirely (the Pine Tree block, which didn’t fit with my color palette and looked more like a WWII bomber than a tree to me), and left one partially undone (I didn’t join the units into the larger block).
I experimented with the half square triangle placement, trying to achieve a pleasing arrangement, and still didn’t really care for them. Odd, because I do like the similar Lady of the Lake block. *shrug*
I liked this one so much I made two! I was surprised how busy they turned out, although I like both of them.
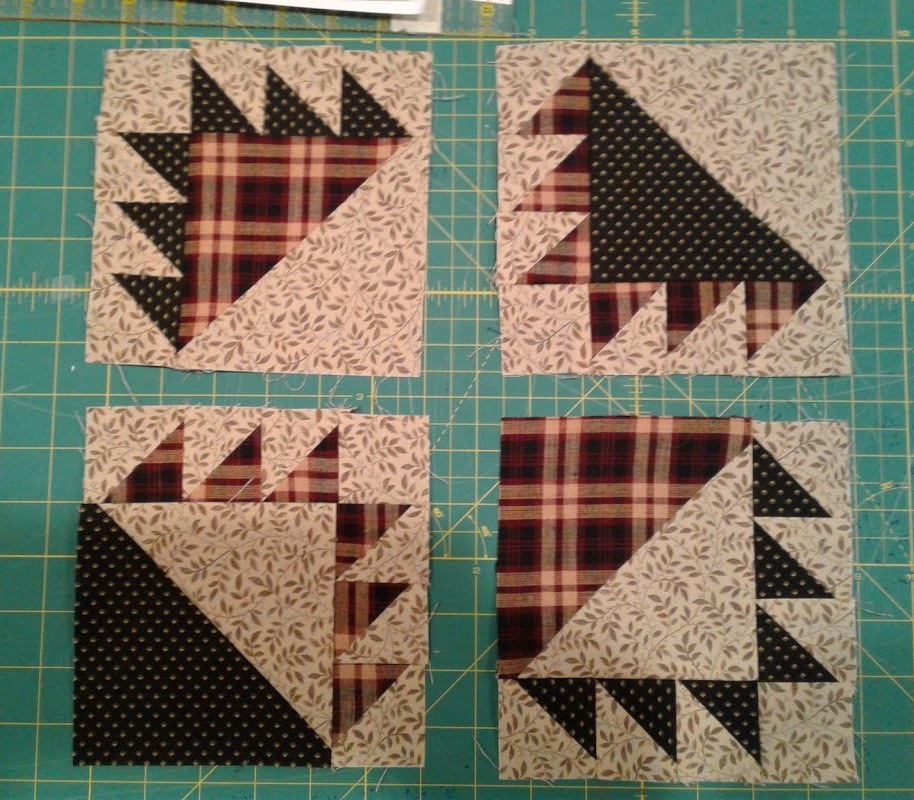
Month/Chapter 3:
I loved making this block! It’s smallish—just 6″, which means that those flying geese units are only 1.25″ tall! These were my first square-in-a-square units and flying geese, and it might be my favorite block I’ve ever made. How much fun are the stripes in the background on the red (my second) version?! Apparently Turkey Tracks is not one of the traditional names for this block (that seems to be another block entirely…?); it’s more commonly known as Devil’s Claw, but there’s another, larger Devil’s Claw block in the book. Stay tuned, because it looks like a lot of fun, too!
This one is a showstopper! It was surprisingly simple to construct/piece, given how complex the block is (how many pieces).
The next class isn’t until June, so I’m stepping back to clean the sewing room and maybe think about some new summer clothes.
…Or some more Lost Ships blocks.
Cozy sewing for the home Wednesday, Feb 13 2019
Uncategorized 6:53 pm
Wow, it’s been ages since I’ve updated anything here (do all my posts start that way?)! I put up a couple of entries on some costuming projects, but I didn’t actually publish them (Boushh and the Orville costumes). I will, eventually. But since I’m tired of looking at last year’s Christmas sewing, I’m tossing up a couple recent, and not-so-recent projects, just to refresh things around here. 😉
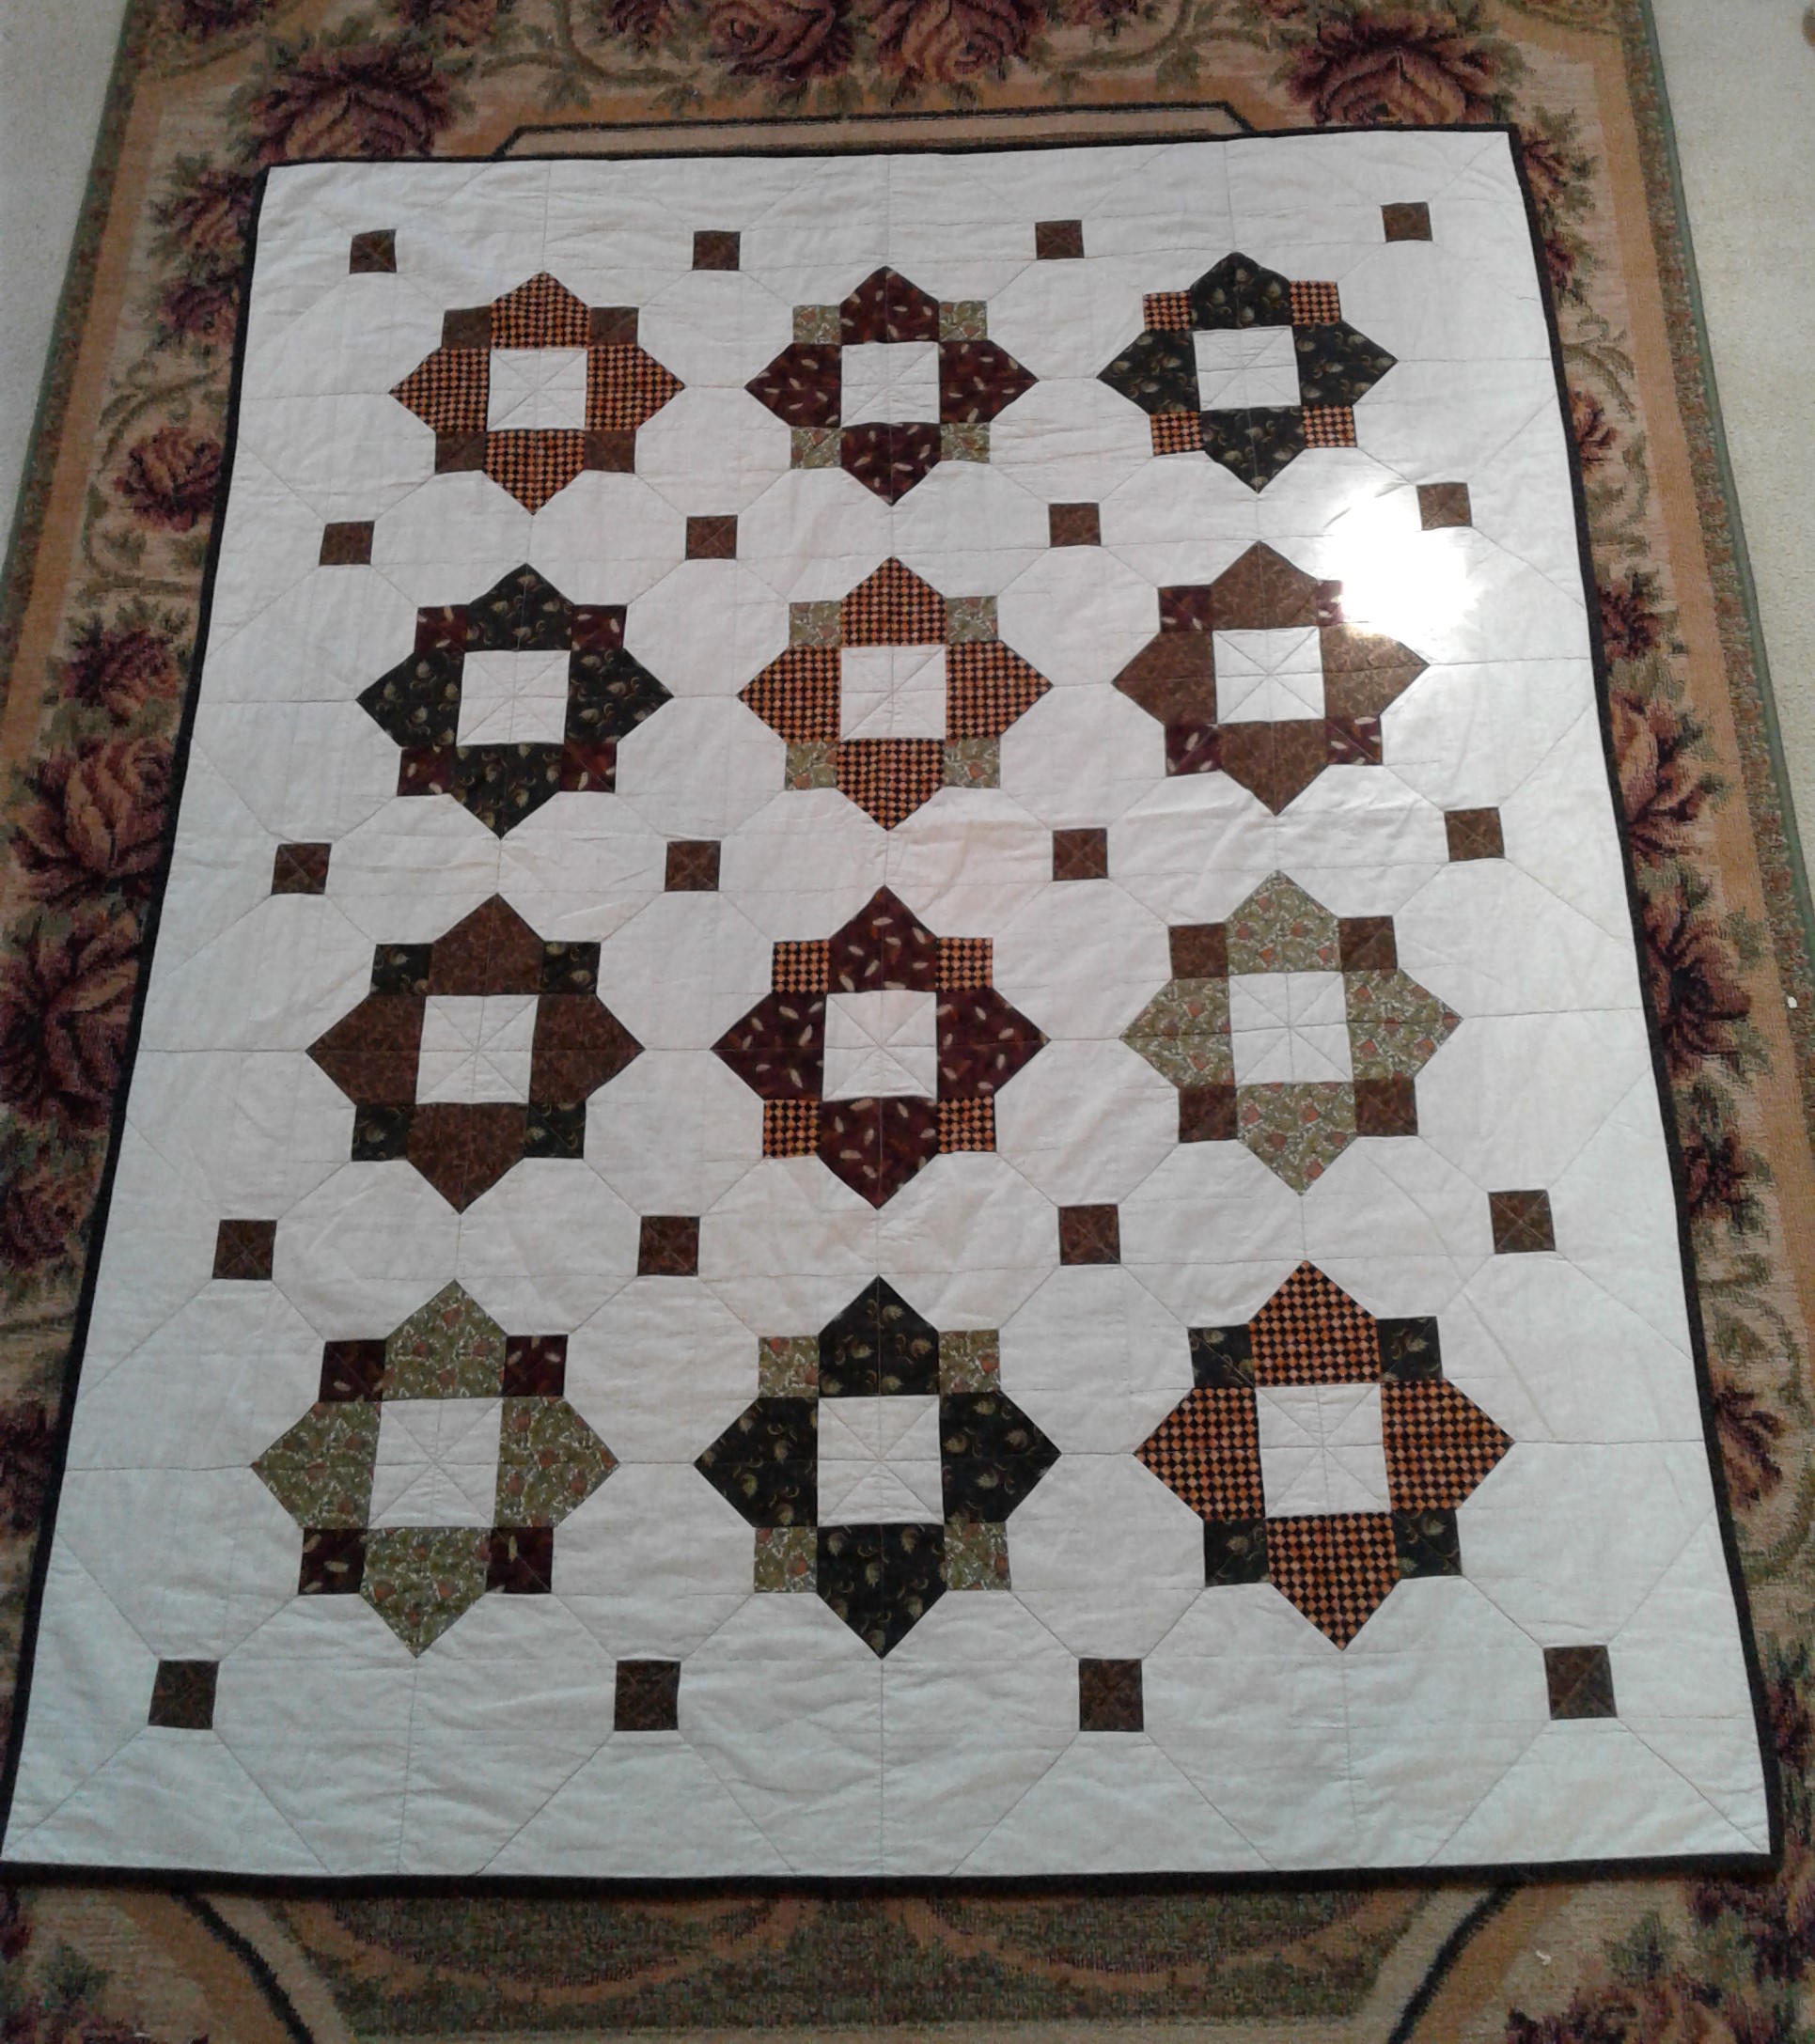
First up, I’ve been making more quilts! This is my second, which I finished some time in 2017. I love everything about this quilt and it really deserves its own entry, but this is the best I have for now. The pattern was the Cabin Fever freebie from the Five Fat Quarter Fun series by Jedi Craft Girl and Gigi’s Thimble. FABULOUS pattern! This quilt is getting daily use here–what more could you ask?
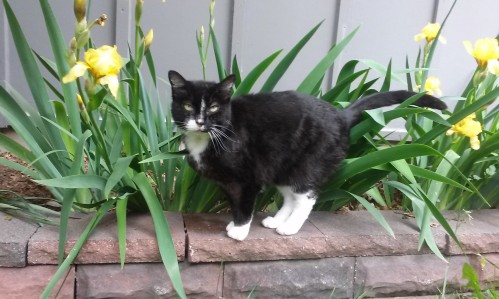
Last spring, I made Quilt #3, “Scrap Happy” from Better Homes & Gardens Scrappy Quilts. I spotted this on Pinterest, and was determined to make it exactly like the inspiration/model. This color palette was so fun and cheerful! This was a gift for my in-laws, and was thoroughly vetted and tested throughout the construction, by Boo:
Because every house always needs more blankets, I turned some of my favorite stash fabric into a snuggly duvet. This started as a a cut of luscious Tencel twill–a soft, drapey, yummy, snuggly fabric in beautiful colors and a print that was lovely up close… but sort of weird from a distance. It’s been hanging around for a few years, and I couldn’t think of a garment it would look good as. I kept thinking, “All I really want to do is wrap myself up in this fabric…” and then I thought, “Why the heck not?!” Enter the Purl Soho lap duvet tutorial, et voila, snuggly Tencel throw! Totally NOT embarrassing way to just wrap yourself in your favorite fabric.

Full disclosure, this project was actually a huge PITA to make. Click here to read all the gory details.
This was the last project before I was sidelined by a knee injury (which has turned out to be a chronic condition, sigh), but around Christmas last year I managed to eke out enough mojo to finish my first crewel project! I made this adorable folk art pillow for my parents:
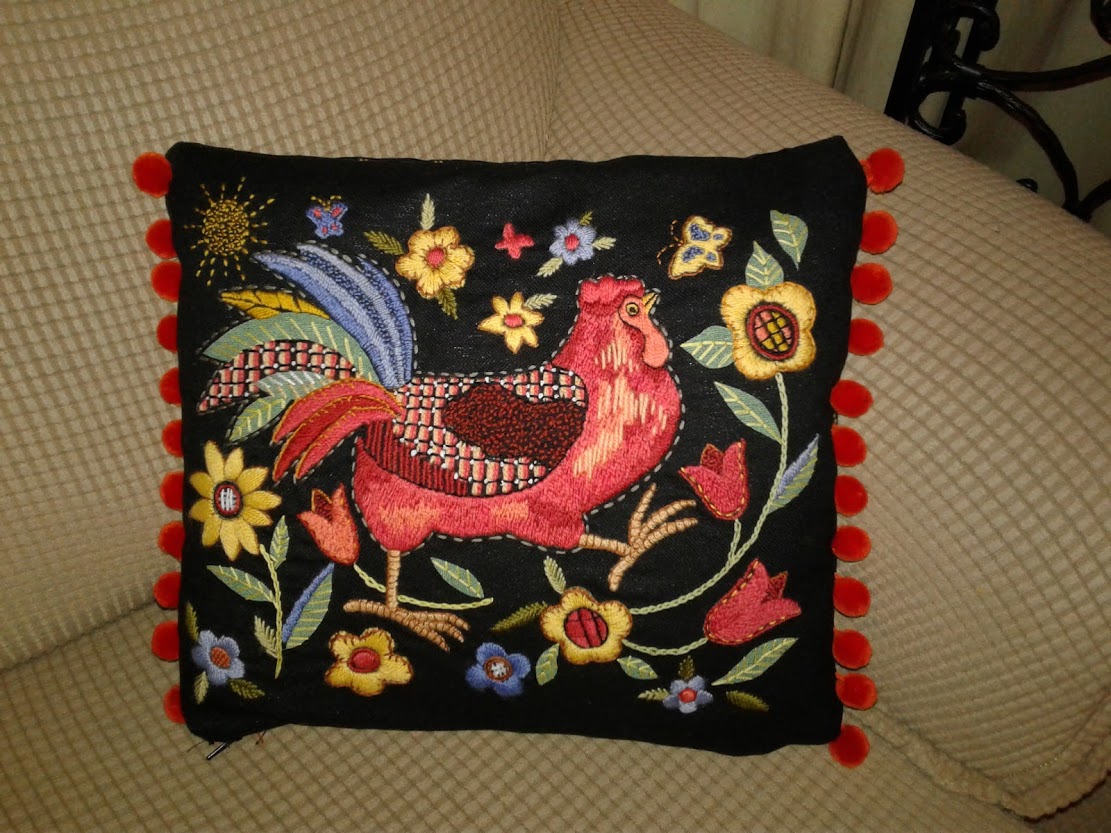
It’s from a Dimensions kit based on a Susan Winget design. It was a blast to stitch! I’d actually had the kit for a few years but had only stitched a couple of the flowers. My parents have recently downsized to a one bedroom apartment, and so we look for small, low-clutter gifts! This pattern coordinates with the folk-art style bedding they chose for their new (ONE!) bedroom, so I thought it would make a perfect pillow.
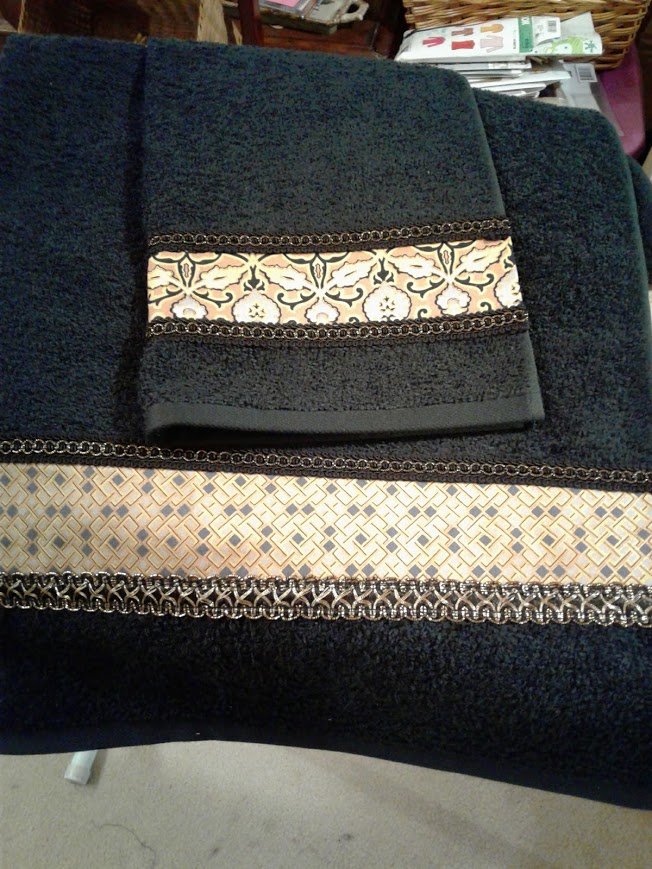
Which reminds me… I forgot something! Another gift for my mom–a housewarming/birthday present: Tarted-up towels. Using leftover jelly roll strips from the placemats I made her a couple of years ago, and a bunch of trim from stash, I decorated a set of towels for their new house:
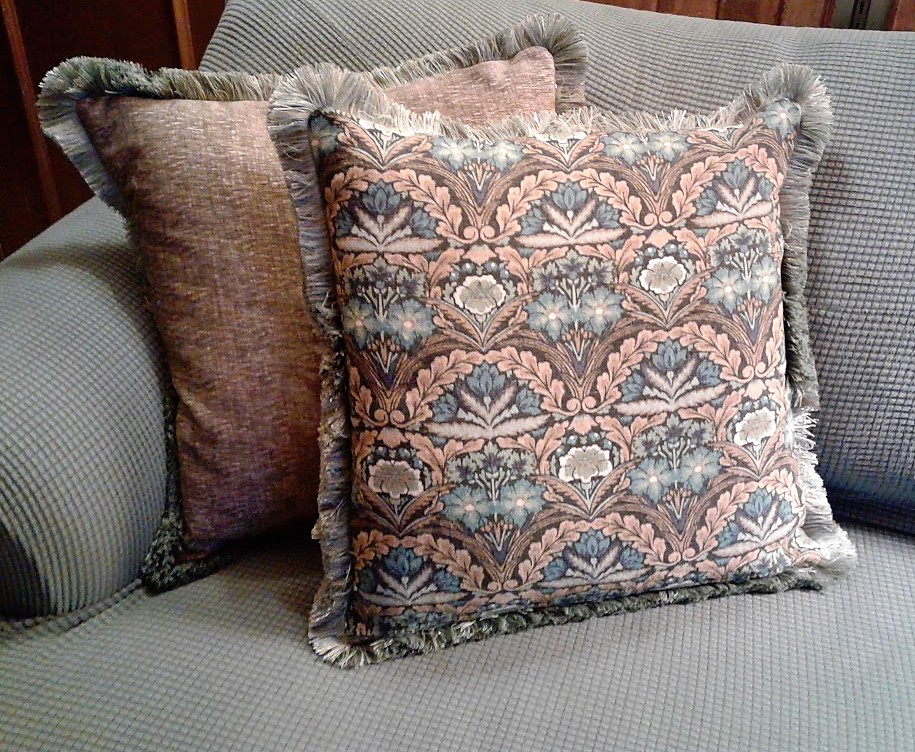
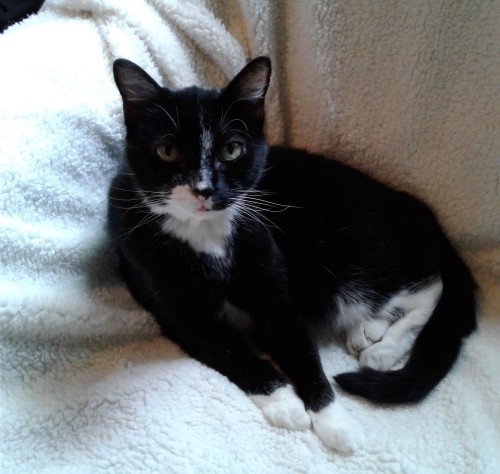
Continuing the pillow theme, I’ve been meaning to update our aging throw pillow situation, throughout the house. I started with a couple of big sofa pillows for the living room:
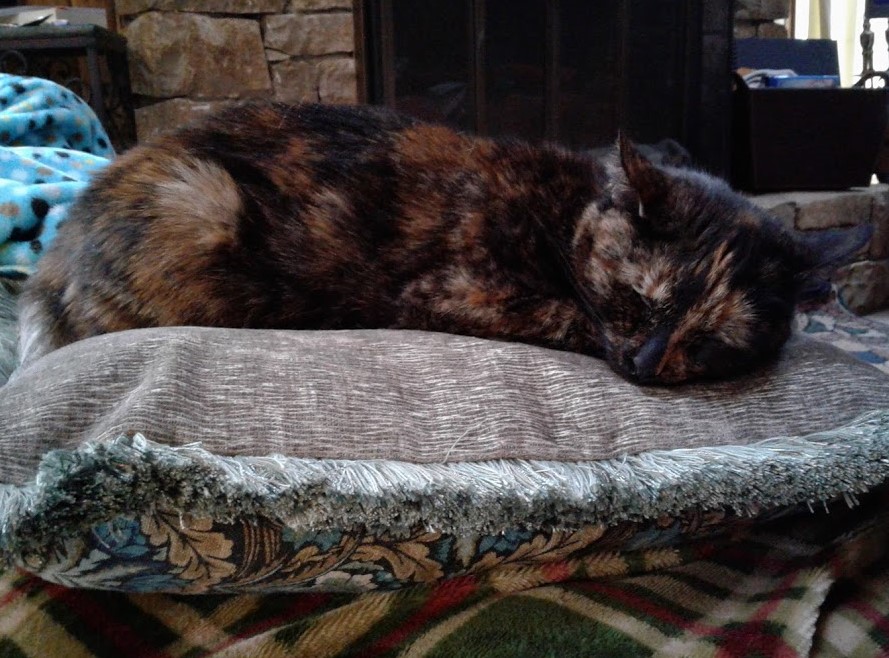
They have also met with Feline Approval:
Coziness Achieved. We have blankets, cats, and pillows for everyone.
Popovers for Winter! Tuesday, Jan 23 2018
Uncategorized Butterick 5997, making, Oliver+ S Jump Rope Dress, popover top, sewing 7:03 pm
Jan 23, 2018
It has been WAY too long since I’ve posted! I have an almost-complete post on a major cosplay build from last year (I just need to edit the photos), and I still haven’t gotten pictures from the second quilt I made–which has been claimed by the cats, so my plan to hang it on the living room is moot! But I DO have pictures of the latest episodes in my ongoing love affair with popover tops.
First up are the tunics/dresses I made for my twin nieces:


It’s hard to tell from that picture that these are wee little toddler dresses, for five-year-olds. 🙂 I looked high and low for a children’s analogue for my favorite popover pattern, Butterick 5997:

And finally found the Oliver + S Jump Rope Dress:
I tweaked the View B dress to match my vision–omitted the pockets, changed the collars to simple bands, and gave them convertible roll-tab sleeves and shirttail hems. The fabrics are lovely cotton-blend herringbone plaids with deep saturated colors and a lovely drape. In fact, the fabric ended up looking quite a bit dressier than I was expecting, so I styled them with some black turtlenecks (it’s chilly in the Bay Area!) and belts. But I’ll bet they also look great with leggings and sneakers. 🙂
Here are a couple more pictures:

I’ve now made SIX popover type tops, and these little ones were just as fun to make as their grownup cousins. In fact, I had some of the fabric left over, so…
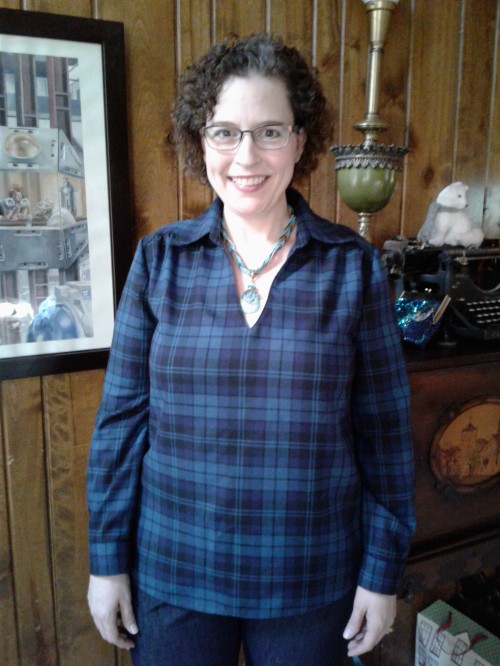
Yep, that’s B5997 number four! 🙂 This time I added a full collar and long sleeves with actual functional buttonholes. I made some small but significant tweaks to my sewing machine setup and–cross your fingers–it seems to have solved my ongoing buttonhole trauma! I may not need a new machine after all (although I don’t like the way the LCD screen keeps fading out on me….) I have more of the red plaid, too, but have a new pattern picked out instead.
Also, longtime friends and readers, your eyes do NOT deceive you: I have indeed whacked off all my hair. It’s gradually been getting shorter over the last six months or so, and now it’s officially the shortest it’s been in 28 years. I thought that my hair might have relaxed over the decades, maybe gotten wavy instead (it’s much thinner and finer than it was when I was young)… Nope! It’s just as curly as it was when I was five. LOL The only difference is, 38.5 years later, I love it. 🙂
Next up is a whole SLEW of cosplay sewing—Planet Comicon is in less than a month, and I am way behind. I’ll try to get the last cosplay post up before I have to write the new one.
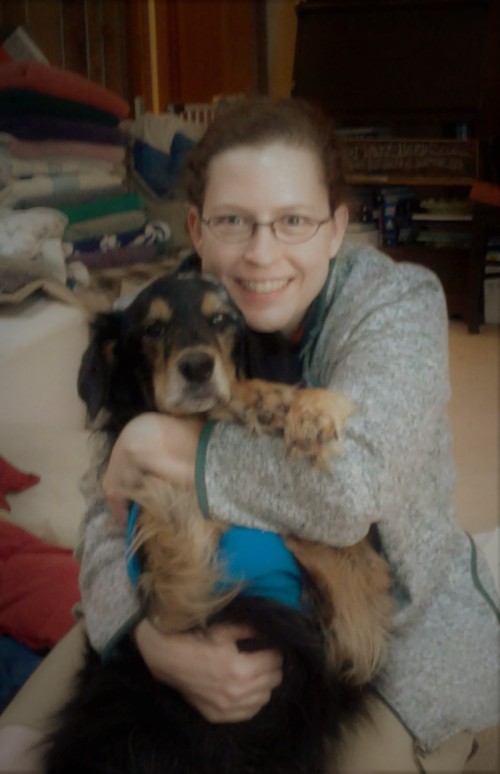
The Most Important Thing about Sophie Wednesday, Nov 15 2017
Uncategorized 7:55 pm

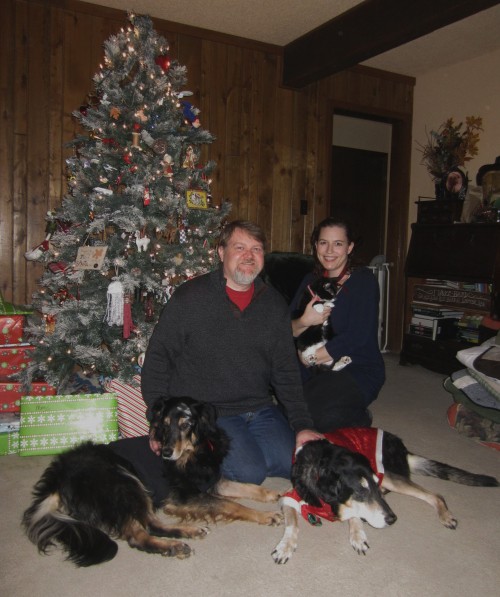
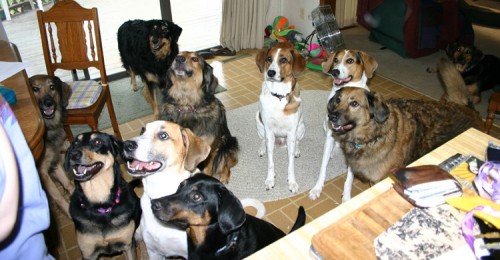
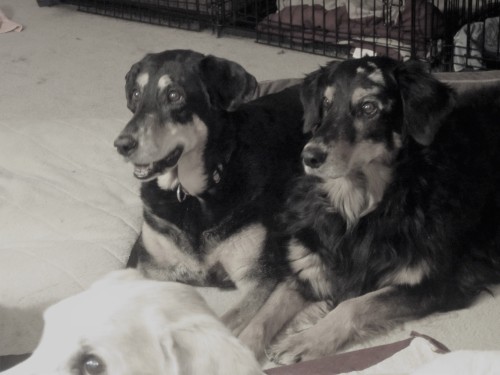
I am sitting here at the computer with a new friend in my lap, remembering old ones. In particular, I’m thinking about someone who was barely here long enough to be anything but new, but whose presence meant everything at a time we really needed her. Regular readers and friends know our story, how we raised a family of nine coonhound puppies from birth, after finding their mama hit by a car on the highway and bringing her home to join our greyhound. You might also know how hard it got, these last 5 years, watching our kids get old, sick, and pass away. We have no regrets over how we were able to round out our adventure together, but being a senior caregiver is hard. It’s wrenching. It’s exhausting and heartbreaking. Because our pack was so large and so closely knit, we never considered bringing anyone else into the family. So unlike many other large animal families, we didn’t have a periodic influx of new life. Our family was complete, at thirteen, and we planned to see it through to the end that way.
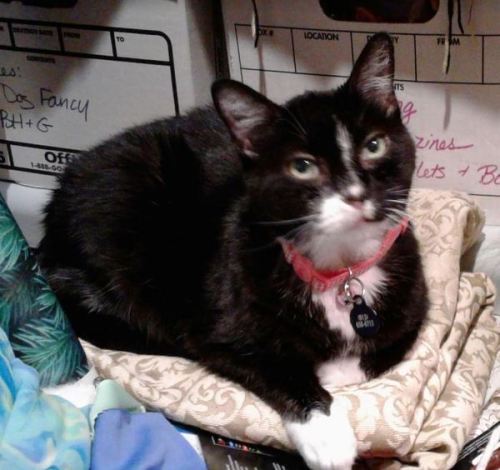
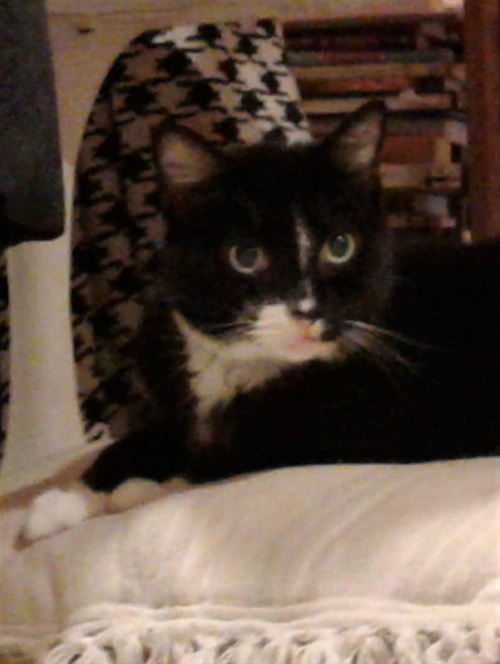
But then there was Sophie. One late, stormy July night in 2015, CJ took the garbage out—and never came back. After about fifteen minutes, I realized something might be amiss, so I went to check on him. And there, standing in the halo of light from the open garage, were CJ and a tiny neighbor, asking for help. “Excuse me, sir? It’s late and raining and I have nowhere to stay.” This wee black and white kitty had run right up to him, meowing her head off. What could we do? It was after midnight, and it was pouring rain. But we still had five dogs in the house. So she spent the night in our garage, and we sent her back home in the morning.
My name is “No.” My number is “No.” My sign is “No.”
But she kept coming back. For a whole year, CJ and this little stray cat forged a friendship, and she became a natural extension of our caregiving duties. Did she have food? Water? Shelter? Companionship? Was she warm enough in the winter, cool enough in our hot hot summer? Whenever I’d leave the house, she’d be right outside the front door—only to give me a look of disgust. “Oh, it’s you,” she’d sniff, and walk away. And if we came out with one of the dogs? The betrayal in her face was hilarious.
As the year went on, our family at home got smaller and smaller. And the little stray cat’s life started to seem more and more urgent. Was she staying safe from cars? Was anyone taking care of her medical needs? What about the hawks and foxes in the neighborhood? Other neighbors were sharing the duty of looking out for her, setting out food and water, but we started bringing her in overnight when it was too stormy, or during the day when it was too hot.
“I have exceptional taste in fine fabric.”
At first, it was all about us helping her. But it quickly became evident how much she brought to our lives. Our last three old dogs (now over 15) responded to her like they hadn’t done in months. They were thrilled by their new family member (probably more than she was!). She perked up EVERYTHING in our household. All our lives, for the past few years, had been about sickness and dying and endings. And suddenly there was somebody NEW and YOUNG and ALIVE. She changed everything. She reminded us that we still had more love (sometimes I had forgotten, in the grind and stress of elder caregiving), that although our big adventure was coming to an end, there were new adventures ahead of us.
Christmas 2016, with all the girls
All of that, in a tiny, nine-pound cat.
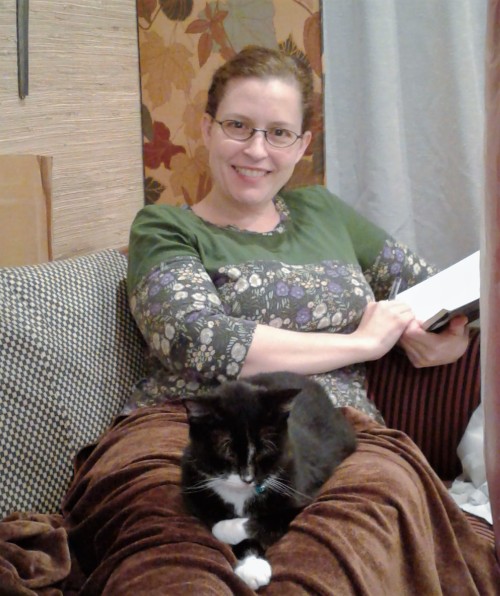
Research Consultant, Muse, and Writing Supervisor On Duty
And there was even more. A chance remark from an acquaintance sparked an idea (“You should write a book about that.”), and that tiny cat breathed new life into my work, as well. As life with dogs wound down, we started to learn about cats. Or at least this one cat. She was calm and confident and knew not to show any fear around the dogs, and even our big guard dog Jade came to respect her. She had Strong Opinions about everything, which she vocalized liberally. Her favorite word was “No.” Do you like your dogs? No. Do you want to play? No. Do you think I should wear this top to writers group? No. She was convinced that there should be six or seven meals a day, all of them breakfast. She gave amazing massages, and sweet little kitten kisses.
When she joined our family for good, we named her Sophie, after the raven-haired grifter in “Leverage” (played by Gina Bellman), who could sweet-talk her way into any situation. She had us on the long con, and reeled us in. We could not have been happier.

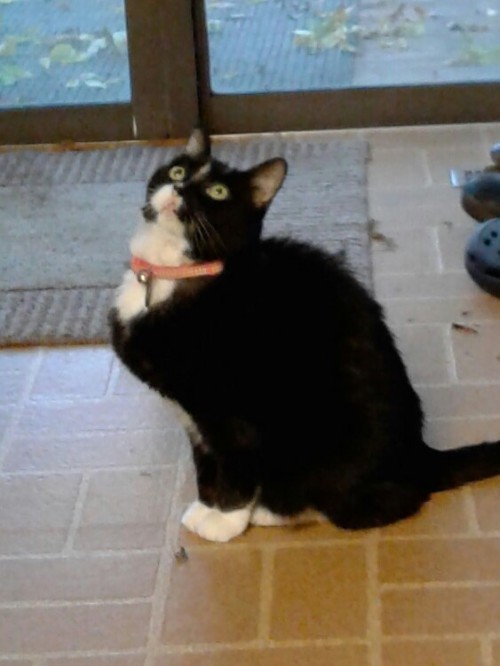
She meowed and meowed at me until I came to see The Best Sunbeam Ever.
We thought she’d come into our lives to save us from our grief. Which is why it was such an unbearable shock to have her ripped away just two months after losing our last dog. It was unimaginable. How could this young, beautiful, perfect life just disappear, so suddenly? We have suffered a lot of grief in the past decade. Losing your entire family is inconceivable, even when you go through it. But with each of them—even the really tough ones, like losing Mama Nelly at 8 from kidney failure—there felt like there was some consolation there. We’d saved Nelly and her pups’ lives. Nelly deserved more than the extra seven years we bought her, but those seven years were a HUGE win. All her pups lived to be at least eleven; two lived to sixteen. We had two cancer survivors, a stroke survivor, and more than one life-saving surgery. We only had our greyhound for seven years, too, but even he lived to be 13. Everyone had a good run. Except Sophie.
It was hard to imagine how we’d go on. I didn’t even want to come back to the house without her there, let alone think of finishing the book we’d started together—the one she’d sat on my lap while I wrote about her. This story doesn’t have a nice tidy ending; I still don’t know how to wrap it up in any kind of sensible way. It just stopped. The main character died, and there’s no more to tell, except the hole she left behind.
There is, however, a new story. It’s not Sophie’s amazing story, but it would not have been possible without Sophie, and what she taught us about new chapters and opening up our hearts again. And that is the most important thing about Sophie, and that’s what I want to remember: That she lived. She was here. She taught a grieving family how to love again. And that’s what I wanted you to know about her, too.
Thanks for reading. We really miss her.
RIP Sophie “Kitcat” Bunce, 20??-October 21, 2017
Goodbye, Sweetheart Saturday, Aug 12 2017
Uncategorized 6:22 am
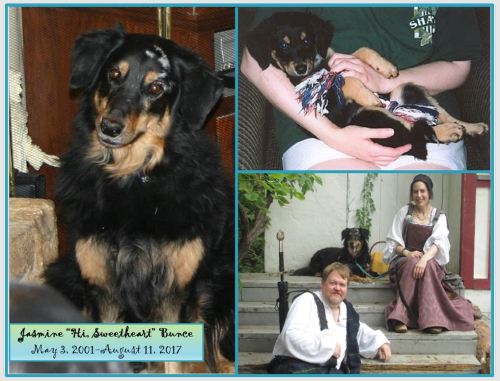
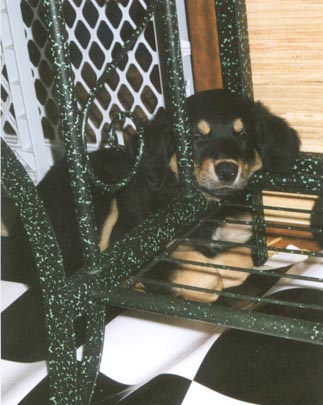
Once upon a time, there were eleven. Then, somehow, just one. Now, far, far too soon, we are empty nesters. Jasmine, the last of our litter—our kids, the family we spent the last 16 years raising—has passed away, just a couple months after a very Sweet 16.
What can I say about Jazzie, that would capture her bright, feisty, sweet spirit, without somehow diminishing her? What can I say about losing her, that honors her, and doesn’t put the burden of all our losses onto her? For I am only now, finally, beginning to feel the magnitude of what we’ve lost. She was a precious unique soul worthy of an entire heartbreak on her own accord, but as long as she was still here with us, in a way, so were her mom, and her 8 brothers and sisters. It was never quite over, until now.
I have a lot of thoughts about the experience of shepherding our family of dogs into old age and into the undiscovered country—thoughts about hospice and suffering (or not!) and how to say goodbye—but those will come later. Right now, I want you to know about Jazz.

She was loud. She had Strong Opinions. She kept abreast of all the neighborhood, family, and household goings-on–a true Newshound! She had a short, sharp bark that she employed freely, liberally, and with abandon. She was the inspiration for Pilot, the bright-eyed, bushy-tailed dog in my book A Curse Dark as Gold. She was an excellent communicator; a much better communicator, sometimes, than we were interpreters! (It took us ten years to realize she barked at us during dinner because we weren’t making eye contact with her!!)

With Gracie Pigeon, who we lost in 2015
She was sweet—so, so very sweet! When you saw her, you could not help the first words out of your mouth being “Hi, Sweetheart!” It came so naturally, that she grew to think it was her name. You could holler “Jasmine! JAAAAZYYYYY!” until every dog in the state got tired of listening, and she’d totally ignore you. But one quiet “Hi, Sweetheart,” had her trotting right to you. I can remember one of the very first times it happened, when she was a tiny pup. She’d woken up in the middle of the night (definitely not for the last time!) and CJ got up to let her out. Instead of going back to her crate, she wandered into our bedroom. I heard a little rustle by my bedside, switched on the light, saw her bright little face, and automatically said, “Hi, Sweetheart!” I guess she never forgot it, either. She never knew a stranger, because everyone knew her name the first time they met: “Hi, Sweetheart!” they’d say, just looking at her.
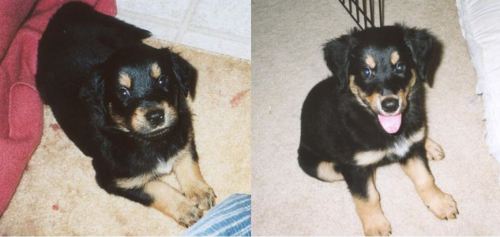
At 6 and 8 weeks old, already alert and watching! (She learned to sit on command by watching me train her brothers and sisters.)
She was even sweet to other animals. If she encountered a baby rabbit or fallen bird in the yard, she would stop several paces back, with a friendly tail-wag; or accidentally wander nose-to-nose into a visiting opossum. Never aggressive, she’d stop, say, “Hello!” and then go on about her way again. Last summer, I heard her barking worriedly from the back yard, and went out to discover the family of fledgling starlings who’d just dropped into the yard. She made sure I found all three babies—even the one hidden behind the deck screen—and got them all to safety again. (She got that from her mom.)
…But it’s just not possible to tell you Jazzie’s story without including her family. She got the name Jasmine because she was one of three black-and-tan sisters, who were almost indistinguishable as pups. Only when one of them unexpectedly grew a long, luxurious black coat at the age of 3 weeks could we tell them all apart. Grandma Judy named her Jasmine, after the princess from Disney’s “Aladdin.”
One of the rare times she was actually asleep.
Of all our pups, she was the least intimidated by our greyhound, her Uncle Whistler. The others regarded him as a god, to be worshipped from a respectful distance–but Jazzie instinctively knew what a gentle soul he really was. She’d walk right up to him to share dropped cookie crumbs or kibbles she knew he didn’t want. He probably just said, “Hi, Sweetheart,” and let her.
She had the most beautiful smile, which seemed to be her natural expression between barks, as if she wanted you to know she was barking at everything happily! She was happy to tell you what you should be doing! Happy to tell you that one of her sisters was at the back door! Happy to tell you Daddy was home!! The mail was here! Happy to direct your attention at dinnertime!
The Twins, Jade & Jasmine, with big brother Flint at foreground
She loved a belly rub, from the time she was a tiny baby. She hated having her nails done (unless it was by her pal Doc). She was a night owl and an early bird, an introvert who was happiest in crowds. She hated the rain, and yet always seemed to end up going for walks in the very worst weather. She liked her own space (and had her own room) when she was younger, but when she got older she loved to snuggle. When she was excited—which was often!—she’d do pirouettes… while barking.
As her own family dwindled, her life got quieter. Except for that voice! It was still going strong literally ten minutes before she left us. She’ll be letting everybody in Heaven know what’s what. Here’s a tip: She answers to Hi, Sweetheart, and she wants you to look at her.
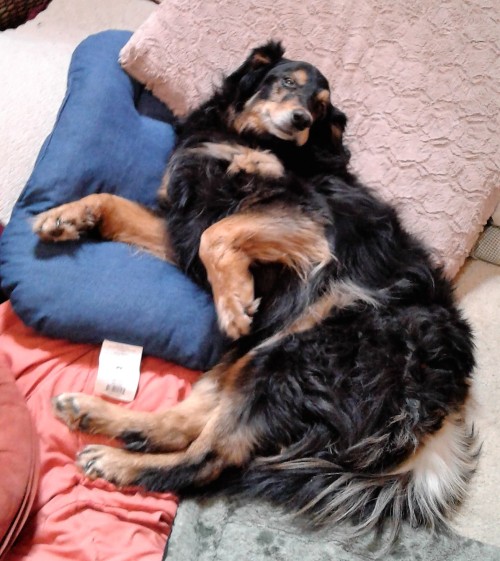
The Good Life: with her new birthday beds, showing how it’s done
‘Bye, Sweetheart. Thanks for everything.

You must be logged in to post a comment.